
WordPress has evolved. You can now edit your entire site – header, footer, every template – right in the block editor.
When I started with WordPress, editing the header meant digging into header.php. Changing the footer required editing a theme file. If you wanted a custom homepage layout, you needed a page builder.
Not anymore.
Full Site Editing (FSE) brings the block editor to your entire site. Every part – header, footer, sidebar, archive pages, single post templates – becomes a collection of blocks that you can edit visually.
In this guide, I’ll cover:
- What Full Site Editing is and which themes support it
- Theme Blocks – Site Logo, Site Title, Navigation, etc.
- The Site Editor (Appearance → Editor)
- Global Styles – design your whole site from one panel
- Editing Templates (Single Post, Page, Archive, Search, 404)
- Template Parts – Header, Footer, reusable sections
- Real examples and workflows
By the end, you’ll understand how to build a complete WordPress site using only blocks – no coding, no child themes, no customizer.
Part 1: What Is Full Site Editing (FSE)?
Full Site Editing is a set of features introduced in WordPress 5.9 (2022) and continuously improved. It allows you to edit every part of your site using blocks.
Traditional WordPress vs. FSE
| Aspect | Classic Theme + Customizer | Block Theme + FSE |
|---|---|---|
| Header | Widget areas or theme options | Editable with blocks |
| Footer | Widget areas | Editable with blocks |
| Homepage | Set as static page + page builder | Built directly in Site Editor |
| Archive page | archive.php (PHP) | Visual template with Query Loop |
| Single post | single.php (PHP) | Visual template with Post Content block |
| Global styles | Customizer (limited) | Global Styles panel (full control) |
| Customization | Requires CSS or customizer options | Built‑in typography, colors, spacing |
Which themes support Full Site Editing?
- Block themes (themes built for FSE) – Twenty Twenty‑Five, Twenty Twenty‑Four, and many modern themes
- Kadence – Partially. Kadence uses its own header/footer builder (not FSE), but supports many block features and the Site Editor for content. For this guide, I’ll explain FSE concepts – they apply to block themes. If you stay with Kadence, you’ll use its Header Builder instead of the Site Editor for header/footer, but everything else (single post templates, archive templates) you can edit in Site Editor if you switch to a block theme or Kadence’s block support.
For the sake of this tutorial, I’ll assume you’re using a block theme (or you want to learn FSE for future projects). Kadence users: you can still learn from the concepts, especially Global Styles and Template editing.
Part 2: Theme Blocks – The Building Blocks of Your Site Structure
Theme blocks are special blocks designed for site‑level elements. You’ll find them in the inserter under the “Theme” category.
1. Navigation Block (replaces custom menus)
What it does: Creates a responsive menu with dropdowns, all editable visually.
Why it matters: No more going to Appearance → Menus. You build menus directly inside the editor.
Key features:
- Add pages, custom links, categories, or post types
- Drag and drop to reorder
- Indent items to create submenus
- Add social icons, search, or buttons inside the navigation bar
- Responsive: mobile menu (hamburger) with breakpoint control
How to use:
- Add Navigation block
- Click “Select menu” or “Create new menu”
- Add items by typing (e.g., “/Home”, “/About”, or paste URL)
- Style: alignment (left/center/right), background, font size, colors
Pro tip: Set the Submenu appearance (light/dropdown) and control the Hamburger breakpoint for mobile.
2. Site Logo Block
What it does: Displays your site’s custom logo (if set). You can upload and crop directly in the block.
Settings:
- Image size (thumbnail, medium, large, full)
- Width (in pixels)
- Link to home (usually yes)
3. Site Title Block
What it does: Shows your site title (from Settings → General). It’s a text block that automatically pulls the title.
Settings:
- Level (H1, H2, etc.) – usually H1 on homepage, P or H2 on other pages
- Link to homepage
- Typography (font, weight, color)
4. Site Tagline Block
What it does: Shows the tagline (description) from Settings → General. Optional block – not every site uses it.
5. Post Title Block
What it does: Used inside the Single Post template. Displays the title of the current post dynamically.
Settings:
- Level (H1 for single posts)
- Link (usually no link)
6. Post Content Block
What it does: The most important block for templates. It outputs the actual content of the post (the block editor content). Without it, your post body won’t appear.
Settings: None – just place it where you want the content to appear.
7. Post Featured Image Block
What it does: Shows the featured image of the current post. Used in single post templates, archives (inside Query Loop), and blog grids.
Settings:
- Image size
- Aspect ratio
- Link to post
8. Post Date, Post Author, Post Terms, Post Comments
These blocks output metadata for the current post. Use them inside single post templates or Query Loop.
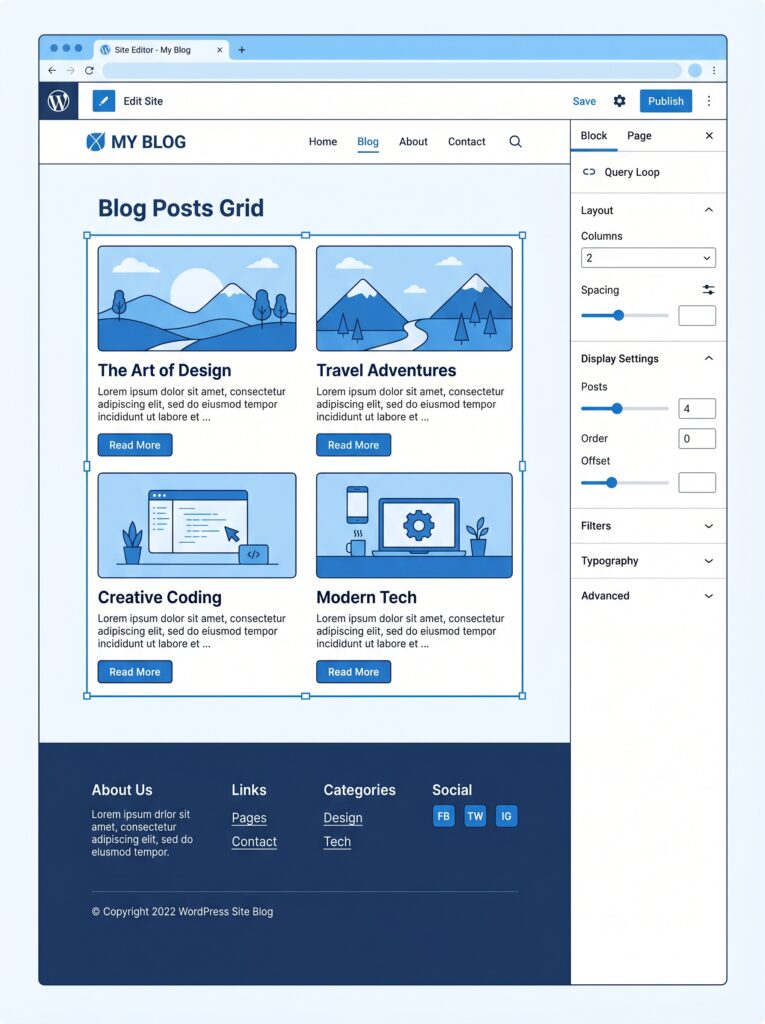
9. Query Loop Block (we covered this in Article 6)
It’s also a theme block. Used to display lists of posts.
10. Template Part Block
What it does: Inserts a reusable Template Part (e.g., header, footer) into a template. Allows you to maintain consistency across templates.
How to use: Create a Template Part (Header), then insert it into all templates (Single Post, Page, Archive, etc.) using this block.
Part 3: The Site Editor (Appearance → Editor)
This is where FSE happens. To access it, you need a block theme activated.
Go to Appearance → Editor (not Customizer).
You’ll see:
- Templates – list of all templates (Index, Single Post, Page, Archive, Search, 404, etc.)
- Template Parts – reusable pieces (Header, Footer, Sidebar)
- Styles – global design controls (colors, typography, layout)
Editing a Template
Click on “Templates”, then choose “Single Posts” (or any template). The editor opens exactly like the post editor, but now you’re editing the entire template.
Example: Edit the Single Post template
- Open Appearance → Editor → Templates → Single Posts.
- The template might include: Post Title block, Post Meta (date/author), Post Featured Image, Post Content block, Comments block.
- You can add blocks around the Post Content block – e.g., a Call‑to‑Action block after every post, a Related Posts Query Loop below.
- Any changes you make here apply to all posts.
Power tip: Create different single post templates for different categories (requires conditionals, but some block themes support it).
Part 4: Global Styles – Design Your Whole Site from One Place
Global Styles is the FSE equivalent of Customizer, but more powerful. It controls the design of your entire site.
How to access:
- Appearance → Editor
- Click the “Styles” icon in the top right (half‑filled circle) – it opens the Styles panel.
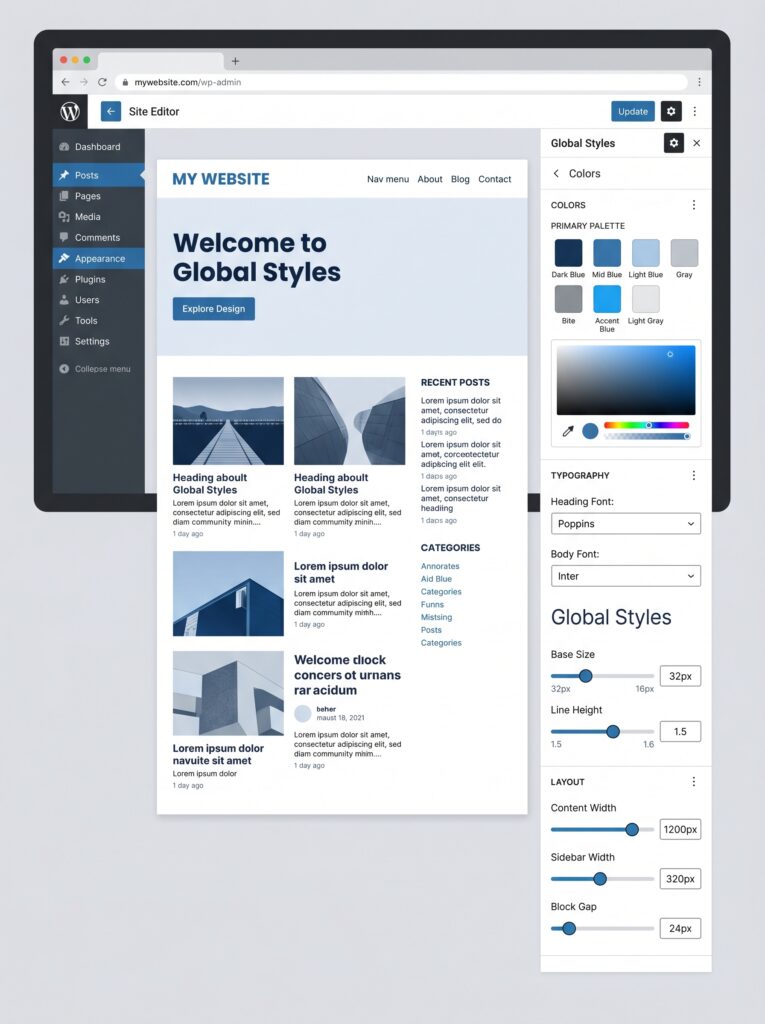
What you can control:
| Category | Settings |
|---|---|
| Typography | Default font for text, headings, links (font family, weight, size, line height) |
| Colors | Primary, secondary, background, text, links, plus custom palettes |
| Layout | Content width, wide width (for full‑width blocks) |
| Blocks | Click on any block type (e.g., Button, Heading, Image) and set its default styles |
Global Styles – per block
This is the killer feature. You can set default styles for every block.
For example:
- Set all Button blocks to have rounded corners (border radius 8px), background = primary color, text = white.
- Set all Heading blocks (H2) to have letter spacing 0.5px and margin bottom 20px.
These defaults apply everywhere, but you can still override them on individual blocks.
Saving and exporting styles
You can export your Global Styles as a JSON file and import them to another site. Great for designers.
Part 5: Template Parts – Reusable Sections
Template Parts are pieces of a template that you can reuse across multiple templates.
Common Template Parts:
- Header (site logo + navigation)
- Footer
- Sidebar
- Post Meta
How to create a Template Part:
- Appearance → Editor → Template Parts → Add New
- Name it (e.g., “My Header”)
- Build it with blocks (Site Logo, Navigation, etc.)
- Save
- Now, in any template (Single Post, Page, Archive), add a Template Part block and select “My Header”.
Why this matters: If you change the header in one place, it updates everywhere. No more editing multiple templates.
Part 6: Real Workflow – Building a Site from Scratch with FSE
Let me walk you through how I’d build a simple blog using FSE (with a block theme).
Step 1: Choose a block theme
Activate a block theme – Twenty Twenty‑Five or a lightweight one like Blockbase or Frost.
Step 2: Set Global Styles
- Go to Appearance → Editor → Styles.
- Set brand colors (primary, secondary).
- Choose heading font (e.g., Inter) and body font (e.g., Lora).
- Set content width to 800px, wide width to 1200px.
Step 3: Build the Header (Template Part)
- Create a new Template Part called “Site Header”.
- Add Site Logo block (upload your logo).
- Add Navigation block (create menu: Home, About, Blog, Contact).
- Style: make it sticky? Add background color? Set alignment (center/space between).
- Save.
Step 4: Edit the Homepage template
- Open Templates → Front Page.
- If empty, add a Query Loop to display latest posts.
- Or build a custom front page with Hero block, columns, etc.
- Insert the “Site Header” Template Part at the top.
Step 5: Edit the Single Post template
- Open Templates → Single Posts.
- Add structure: Post Title, Post Meta (date + author), Post Featured Image, Post Content, Post Comments.
- Below Post Content, add a Query Loop to show related posts (filter by same categories, exclude current post).
- Insert the same “Site Header” Template Part.
Step 6: Edit the Archive (blog) template
- Open Templates → Archive.
- Add Query Loop (or use the default one). Design the Post Template (grid, list).
- Add pagination.
Step 7: Build Footer (Template Part)
- Create new Template Part “Site Footer”.
- Add columns with widget‑like content (about text, recent posts links, social icons).
- Insert into all templates.
Step 8: Global refinements
- Go back to Styles → Blocks → Button. Make all buttons rounded.
- Set default spacing for Group and Columns.
Result: A complete, custom blog theme without touching code or child themes.
Part 7: Kadence Users – What You Can Do (and What You Can’t)
Kadence is a hybrid theme. It supports many block features but not full Site Editor for header/footer.
| Feature | Kadence support | Alternative |
|---|---|---|
| Global Styles | Partial (via Customizer) | Use Kadence’s built‑in color/typography settings |
| Template editing (Single Post, Archive) | Yes (via Kadence > Elements or editing templates) | You can use Site Editor for these if you enable block template editing |
| Header editing | No (use Kadence Header Builder) | That’s fine – Kadence’s builder is powerful |
| Footer editing | No (use Kadence Footer Builder) | Same |
| Query Loop | Yes | Works anywhere |
| Theme Blocks (Navigation, Site Logo) | Yes | Works in content areas, but not in header (use Kadence’s nav menu instead) |
For Kadence users reading this guide: The concepts of templates and template parts are still relevant. You can use the Site Editor to modify your Single Post template (if you switch to block template editing in Kadence). Your header/footer will still be managed by Kadence’s custom builder – and that’s okay.
Common Mistakes in Full Site Editing
- Missing Post Content block – If you edit a single post template and don’t include the Post Content block, your article will not appear.
- Overriding Global Styles inconsistently – If you change button style globally but also change it on individual pages, future updates might conflict.
- Not using Template Parts – Editing the same header in 5 templates manually is a waste of time. Use Template Parts.
- Breaking responsive design – Test your navigation menu on mobile. The hamburger icon should appear at the right breakpoint.
- Forgetting to set a fallback – In Query Loop, always include a No Results block.
What’s Next?
You now understand Full Site Editing – the future of WordPress design. Next, we’ll cover Block Patterns & Reusable Blocks – how to save layouts, share them across your site, and even export them.
👉 Next article in this series: Block Patterns & Reusable Blocks – Save Time, Build Faster
Are you using Full Site Editing yet? What’s holding you back? Let me know in the comments.
📌 Key Takeaways (for skimmers)
- Full Site Editing (FSE) lets you edit headers, footers, and templates visually using blocks.
- Theme Blocks – Navigation, Site Logo, Site Title, Post Content, Query Loop, Template Part.
- Site Editor (Appearance → Editor) replaces Customizer for block themes.
- Global Styles control colors, typography, and layout site‑wide (even per‑block defaults).
- Template Parts = reusable sections (header, footer) inserted into multiple templates.
- Typical templates: Single Post, Page, Archive (blog), Search, 404, Front Page.
- Kadence is a hybrid theme – supports many FSE features but not header/footer editing in Site Editor.