
The marketplace model is one of the most powerful business models in ecommerce. Here’s how to build your own — without writing code.
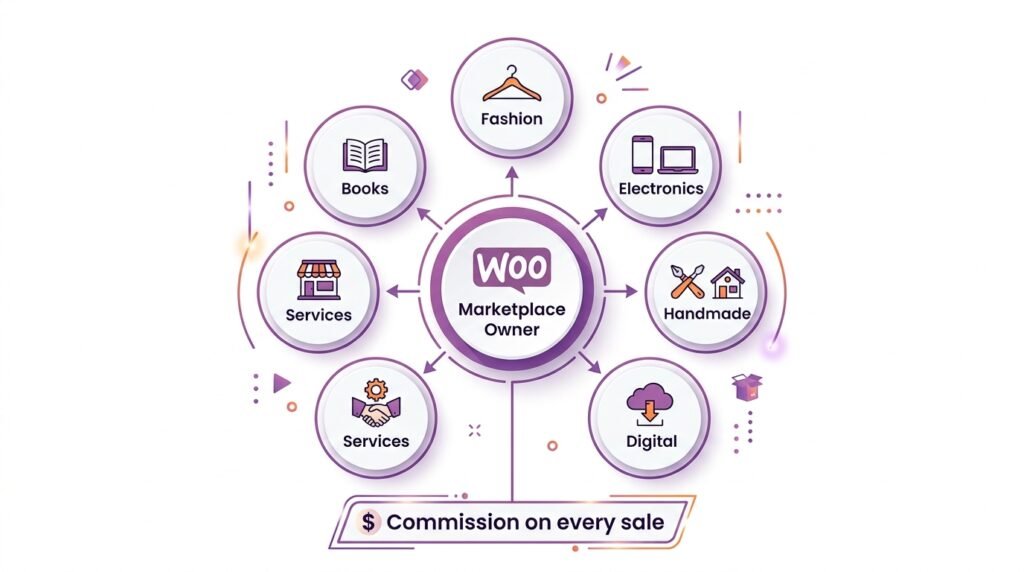
First, imagine this: you own a website where hundreds of independent sellers list their products. Then, you don’t hold any inventory, pack or ship anything, or handle customer service for individual orders. Finally, every time a product sells, you earn a commission.
That’s the marketplace model. For example, it’s how Amazon, Etsy, eBay, and Airbnb work. As a result, with WooCommerce, you can build your own version — for a fraction of the cost of custom development.
However, there’s a catch. A standard WooCommerce store is designed for a single seller — you. To turn it into a WooCommerce multivendor marketplace where multiple independent sellers can list products, manage orders, and receive payouts, you need a marketplace plugin.
What this guide covers:
- What a multivendor marketplace is — and why it’s a powerful business model
- The 4 leading marketplace plugins — Dokan, WCFM, WC Vendors, YITH
- Detailed comparison — features, pricing, and best use cases
- Step-by-step setup (using WC Vendors as our example)
- Commission structures — 6 revenue models with typical rates
- Shipping and fulfilment — per-vendor zones and rates
- Vendor onboarding — the 9-step checklist
- Scaling your marketplace — from launch to maturity
- Common mistakes — and how to avoid them
Let’s build a marketplace that vendors want to join — and customers want to return to.
Part 1: What Is a WooCommerce Multivendor Marketplace?
First, a multivendor marketplace is a WooCommerce store where multiple independent sellers list their own products under a single storefront. Then, the marketplace owner earns revenue through commissions on each sale, listing fees, vendor subscription plans, or a combination of all three. As a result, shoppers browse a unified catalog — but each product is sold and shipped by the vendor who listed it.
How the marketplace model works
| Role | What they do | What they get |
|---|---|---|
| Marketplace owner (you) | Provide the platform, manage vendors, handle marketing | Commission on every sale |
| Vendors (sellers) | List products, manage inventory, fulfil orders | Revenue minus commission |
| Customers (buyers) | Browse and purchase products | A curated selection from multiple sellers |
Why the marketplace model is powerful
First, here are the benefits that make the marketplace model attractive:
| Benefit | What it means for you |
|---|---|
| No inventory | You don’t hold stock or manage warehouses |
| No fulfilment | Vendors handle shipping and customer service for their products |
| Scalable | More vendors = more products = more customers — without you doing more work |
| Recurring revenue | Commissions on every sale create ongoing income |
| Network effects | More vendors attract more buyers; more buyers attract more vendors — a flywheel effect |
Examples of marketplaces you can build
First, here are seven types of marketplaces — with real-world examples:
| Type | Examples | Best for |
|---|---|---|
| Retail | Amazon, Etsy, eBay | Physical products, handmade goods, collectibles |
| Digital | Envato, Shutterstock, Gumroad | Software, e-books, courses, templates, music |
| Services | Airbnb, Booking.com, TripAdvisor | Bookings, appointments, rentals, tours |
| Subscription | CrateJoy, Birchbox | Subscription boxes, memberships |
| Local | Craigslist, Nextdoor, Facebook Marketplace | Hyperlocal buying and selling |
| B2B | Alibaba, Faire | Wholesale, bulk purchasing |
💡 Why this matters: the marketplace model is attractive because it scales without requiring you to hold inventory or manage fulfilment directly. As a result, you provide the platform; vendors do the merchandising and shipping; and you take a cut of every transaction.
For a broader look at WooCommerce’s ecosystem, see our WooCommerce Extensions & Ecosystem guide.
Part 2: Why You Need a Marketplace Plugin
First, WooCommerce is designed for single-store businesses. Then, if you want multiple vendors to sell through one website, you need a marketplace plugin. As a result, the plugin adds features that WooCommerce doesn’t include natively.
What a marketplace plugin adds
| Feature | What it does |
|---|---|
| Vendor registration and approval | Sellers can sign up; you approve them before they list products |
| Individual vendor dashboards | Each seller manages their own products, orders, and earnings |
| Commission management | Set global, per-vendor, or per-product commission rates |
| Product approval and moderation | Approve or reject products before they go live |
| Order and inventory management | Vendors manage their own stock and fulfil orders |
| Vendor payouts | Automated or manual payments to vendors |
| Seller storefronts | Each vendor gets their own branded store page |
| Shipping management | Per-vendor shipping zones and rules |
| Marketplace analytics | Revenue, commission, and vendor performance reports |
💡 However, without a marketplace plugin, you’d have to manually manage every vendor’s products, track commissions in spreadsheets, and calculate payouts by hand. As a result, a marketplace plugin automates all of this.
Part 3: The 4 Leading Marketplace Plugins — Detailed Comparison
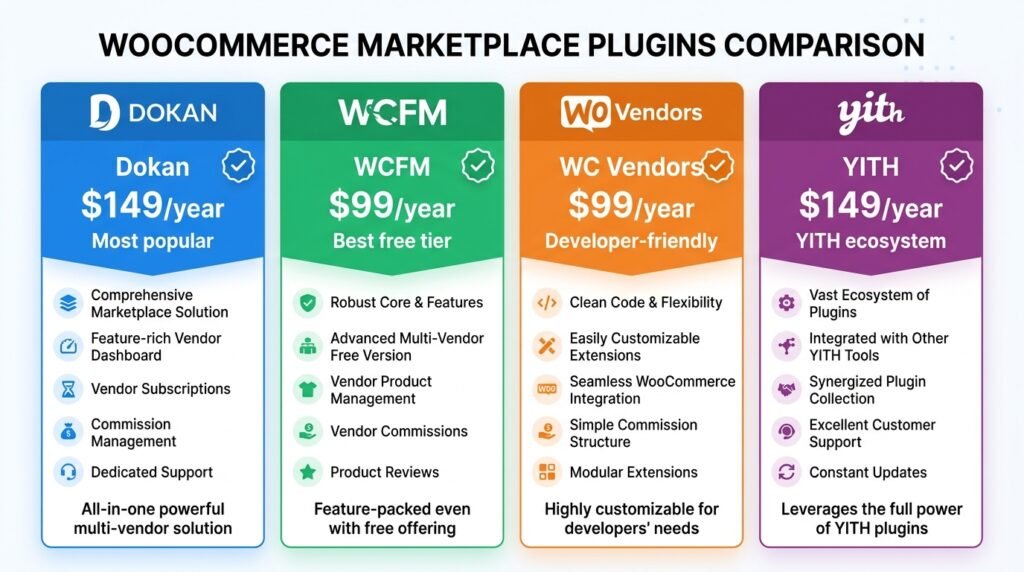
First, four plugins dominate the WooCommerce multivendor space: Dokan, WCFM Marketplace, WC Vendors, and YITH WooCommerce Multi Vendor. Then, each takes a different approach to the same problem. Finally, here’s the complete comparison.
Comparison table
| Feature | Dokan | WCFM Marketplace | WC Vendors | YITH Multi Vendor |
|---|---|---|---|---|
| Free version | ✅ Dokan Lite | ✅ WCFM Free (most feature-rich free tier) | ✅ WC Vendors Free | ❌ Paid only |
| Starting price (Pro) | $149/year | $99/year | $99/year | $149/year |
| Vendor dashboard | Polished frontend | Most detailed frontend | Simpler frontend | Frontend |
| Commission system | Global, vendor, product, category (Pro) | Global, vendor, product, category, membership | Global, vendor | Global, vendor |
| Vendor shipping | Per-vendor zones (Pro only) | Per-vendor zones + weight-based (Free) | Per-vendor flat rate | Per-vendor |
| Vendor verification | Pro module | Built into free version | Pro add-on | Limited |
| Best for | General marketplaces, fastest setup | Complex marketplaces, maximum control | Simple marketplaces, developer-friendly | YITH ecosystem users |
| Active installations | 40,000+ live marketplaces | Thousands | 8,000+ stores | Growing |
| AI features | AI-powered | WCFM AI Suite (add-on) | Limited | Limited |
Deep dive: Dokan — The Most Popular Choice
First, Dokan by weDevs is the most widely used WooCommerce multivendor plugin, with over 40,000 live marketplaces worldwide.
Key strengths:
- Smooth vendor onboarding — registration, store setup wizard, and frontend dashboard are well-designed out of the box
- Commission flexibility — set commissions globally, per vendor, or per product. Pro adds category-based and combined commission types (flat + percentage)
- Module-based architecture — Pro version uses a modular system; enable only the features you need
- REST API — available for custom integrations
- AI-powered — Dokan is marketed as an AI-powered marketplace solution
Where Dokan falls short:
- Dokan Lite is relatively limited. Many features that WCFM includes for free (like vendor shipping and store policies) require Dokan Pro
- Some features (vendor verification, product add-ons) only come with higher-priced plans
💡 Dokan is best if you want a polished, professional marketplace with the fastest path from installation to a working marketplace — and you’re willing to pay for Pro.
Deep dive: WCFM Marketplace — Maximum Control, Best Free Tier
First, WCFM (WooCommerce Frontend Manager) is technically two plugins: WCFM (the frontend manager) and WCFM Marketplace (the multivendor layer). Then, together, they offer the most feature-rich free multivendor solution available. As a result, WCFM is the go-to for budget-conscious store owners.
Key strengths:
- Generous free tier — the core WCFM plugin, WCFM Marketplace, and WCFM Delivery are all free
- 100% frontend vendor dashboard — vendors never need to access wp-admin
- Hyper-flexible commission rules — configure by fixed amount, percentage, percent + fixed, vendor sales, product price, category, or membership tier
- Stripe Split Pay — automatically split payments between the marketplace and vendors at checkout. SCA compliant with 3D Secure support
- WCFM AI Suite (add-on) — vendors can generate SEO-optimized product descriptions and enhance product images from inside their dashboard
- Granular vendor capability controls — you control exactly what each vendor can do
Where WCFM falls short:
- Complex setup — it’s a “very big, complex” plugin that takes time and effort to configure
- Premium version ($198/year) adds advanced features like vendor verification and analytics
💡 WCFM is best if you want maximum control and the most features in the free version — and you’re willing to invest time in setup.
Deep dive: WC Vendors — Simple and Developer-Friendly
First, WC Vendors is the oldest multivendor solution for WooCommerce, trusted by over 8,000 stores. Then, it focuses on simplicity and a lean, no-bloat foundation. As a result, it’s the best choice for developers who want a clean codebase.
Key strengths:
- Easy setup — comes with a setup wizard to guide you through initial configuration
- Developer-friendly codebase — clean, well-documented code
- Free version is functional — includes vendor user role, vendor stores, commission rates, simple/variable/digital products, and a basic frontend dashboard
- Pro version adds features — vendor dashboards, shipping management, coupons, vendor vacation mode, store notices, product reviews
- Stripe Connect integration — automated vendor payouts
Where WC Vendors falls short:
- Free version has a simpler dashboard compared to Dokan and WCFM
- Fewer features per dollar compared to WCFM’s generous free tier
- No lifetime deal — yearly renewal is mandatory for updates and support
💡 WC Vendors is best if you want a simple, lightweight, developer-friendly marketplace with a low learning curve.
Deep dive: YITH WooCommerce Multi Vendor — The YITH Ecosystem Choice
First, YITH WooCommerce Multi Vendor is a focused WooCommerce vendor marketplace plugin. Then, it extends product, commission, and storefront workflows without replacing your core shop setup. As a result, it’s ideal for stores already using other YITH plugins.
Key strengths:
- Part of YITH ecosystem — integrates with other YITH plugins (booking, subscriptions, etc.)
- Focused functionality — doesn’t overload your store with unnecessary features
- Professional — transforms a standard WooCommerce store into a fully functional multivendor marketplace
Where YITH falls short:
- Paid only — no free version available
- Starting at $149/year, it’s similar in price to Dokan but with fewer features
💡 YITH is best if you’re already using other YITH plugins and want a focused, professional marketplace solution within the same ecosystem.
Which plugin should you choose?
First, match your situation to the recommended plugin. Then, install and start building.
| Your situation | Recommended plugin |
|---|---|
| Fastest setup, polished experience | Dokan (Pro) |
| Most features in free version, maximum control | WCFM Marketplace |
| Simple, lightweight, developer-friendly | WC Vendors |
| Already using YITH plugins | YITH WooCommerce Multi Vendor |
| Tight budget, need a free option | WCFM (free) or WC Vendors (free) |
Part 4: Step-by-Step — Setting Up a Multivendor Marketplace
First, let’s walk through setting up a complete marketplace using WC Vendors as our example. Then, the steps are similar for other plugins. As a result, you can adapt this workflow to any marketplace plugin.
Step 1: Install WooCommerce and choose your hosting
First, every marketplace starts with a standard WooCommerce installation. Then, if you don’t already have a WordPress and WooCommerce site, set those up first using a host that can handle WordPress at scale.
Recommended hosting for marketplaces:
| Traffic level | Recommended hosting |
|---|---|
| Under 10,000 visitors/month | Shared hosting with caching (SiteGround, Hostinger) |
| 10,000–50,000 visitors/month | Managed WordPress hosting (Kinsta, WP Engine) |
| 50,000+ visitors/month | VPS or dedicated server (Cloudways, Liquid Web) |
💡 Why it matters: managed WordPress hosting providers handle multivendor traffic patterns better than shared hosting. For example, vendor admin activity, frontend dashboard requests, and customer transactions can spike unpredictably. For a deeper comparison, see our Choosing the Right Hosting guide.
Step 2: Choose and install your marketplace plugin
First, install the plugin from your WordPress dashboard:
- Go to Plugins → Add New
- Search for your chosen plugin (e.g., “WC Vendors” or “Dokan” or “WCFM Marketplace”)
- Click Install Now, then Activate
Then, for WC Vendors specifically:
- Search for “WC Vendors”
- Click Install Now, then Activate
- The plugin comes with a setup wizard to guide you through the initial setup
Step 3: Configure marketplace settings
First, configure the core settings for your chosen plugin:
For WC Vendors:
- Go to WC Vendors → Settings after activation
- Configure general settings:
- Vendor registration — enable vendor sign-up
- Commission rate — set your default commission (e.g., 20%)
- Vendor store page — configure how vendor storefronts appear
For Dokan:
- Go to Dokan → Settings after activation
- Configure:
- Vendor dashboard — customize the frontend dashboard
- Commission — set global commission rates
- Registration — configure vendor registration and approval
For WCFM:
- Go to WCFM → Settings after activation
- Configure:
- Commission rules — set global, per-vendor, or per-product commissions
- Vendor dashboard — customize the frontend experience
- Payout gateways — configure Stripe, PayPal, etc.
Step 4: Set up commission structures
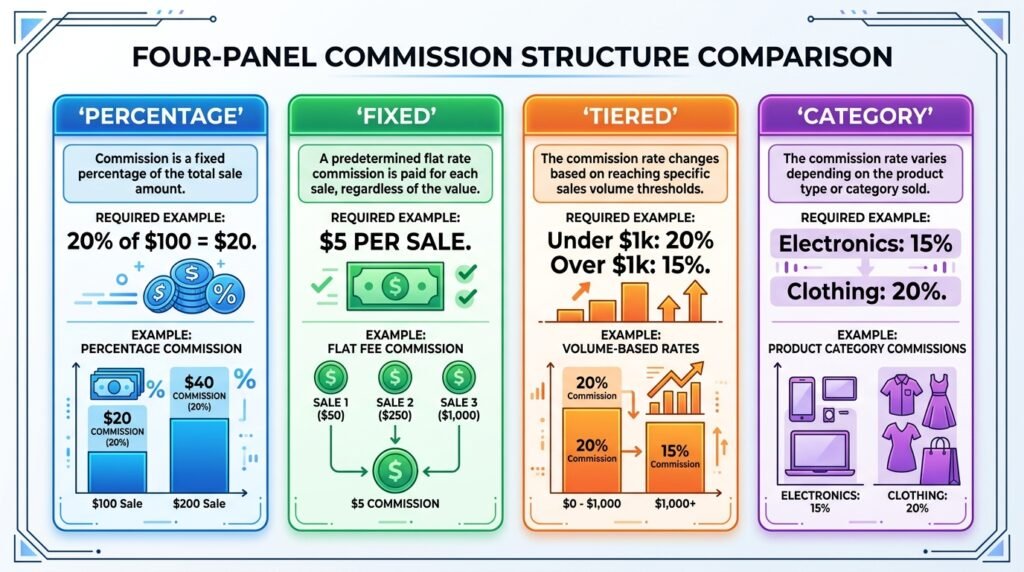
First, your commission structure determines how you earn revenue from the marketplace. Then, here are the six main types:
| Type | How it works | Example |
|---|---|---|
| Percentage | You take a percentage of each sale | 20% of $100 = $20 commission |
| Fixed amount | You take a fixed amount per sale | $5 per sale |
| Percentage + fixed | Both percentage and fixed amount | 10% + $2 per sale |
| Vendor-specific | Different rates for different vendors | Vendor A: 15%; Vendor B: 25% |
| Category-specific | Different rates for different categories | Electronics: 15%; Clothing: 20% |
| Tiered | Rates based on sales volume | Under $1,000/month: 20%; over: 15% |
Recommended starting approach:
- Start with a simple percentage commission (10–20%)
- Adjust based on your niche and margins
- Offer lower rates to high-volume vendors to incentivize growth
💡 As a result, you can also generate revenue through listing fees, vendor subscriptions, or transaction fees. However, many marketplaces use a combination of these.
Step 5: Set up vendor payouts
First, your vendors need to get paid. Then, most marketplace plugins support three payout methods:
| Method | How it works | Best for |
|---|---|---|
| Stripe Connect | Automatically splits payments between you and the vendor at checkout | Most marketplaces — automatic and SCA-compliant |
| PayPal Direct Pay | Pay vendors via PayPal | Marketplaces with PayPal-first vendors |
| Manual payouts | You pay vendors manually after each sale or on a schedule | Small marketplaces with few vendors |
Setup for Stripe Connect (recommended):
- Create a Stripe account
- Configure Stripe Connect in your marketplace plugin settings
- Set payout schedules (e.g., daily, weekly, monthly)
- Test with a small transaction before launching
💡 Stripe Connect is the gold standard for marketplace payouts. It automatically splits payments, handles 3D Secure, and supports cross-border payments. As a result, you spend less time on manual accounting.
Step 6: Configure shipping for vendors
First, in a marketplace, each vendor handles their own shipping. Then, most plugins support three shipping models:
| Shipping model | How it works | Plugin support |
|---|---|---|
| Per-vendor shipping zones | Each vendor sets their own rates and zones | Dokan (Pro), WCFM (Free), WC Vendors (Pro) |
| Weight-based shipping | Rates based on product weight | WCFM (Free), WC Vendors (Pro) |
| Flat rate per vendor | Simple fixed rate for all products | WC Vendors (Free) |
Step-by-step for WC Vendors:
- Go to WC Vendors → Settings → Shipping
- Enable per-vendor shipping
- Set default shipping zones and rates
- Allow vendors to override defaults in their dashboard
💡 Pro tip: poor shipping experiences from individual vendors can damage your marketplace’s reputation. First, set clear shipping standards. Then, enforce them. For example, require vendors to offer at least one shipping option under 5 days. See our WooCommerce Advanced Shipping guide for detailed shipping configuration.
Step 7: Create required marketplace pages
First, most plugins create required pages automatically. Then, verify that these exist:
- □ Vendor registration page — where sellers sign up
- □ Vendor dashboard page — where vendors manage their store
- □ Vendor store page — where each vendor’s products are displayed
- □ Terms and conditions page — marketplace rules
For each plugin:
- WC Vendors: the setup wizard creates these pages for you
- Dokan: pages are created during installation
- WCFM: pages are created during installation
Step 8: Onboard your first vendors
First, now it’s time to attract vendors to your marketplace. Then, here’s the onboarding checklist:
| Task | What to do |
|---|---|
| Create vendor application | A page explaining the benefits of joining your marketplace |
| Set clear expectations | Commission rates, shipping requirements, product guidelines |
| Offer incentives | Reduced commissions for early vendors |
| Provide support | Documentation, onboarding calls, quick support responses |
| Showcase successful vendors | Case studies and testimonials from early adopters |
How vendors sign up:
- Vendors visit your registration page
- They fill out the vendor application form
- You approve their application (or auto-approve if you prefer)
- They receive access to their vendor dashboard
- They start listing products
💡 The chicken-and-egg problem — attracting both vendors and buyers simultaneously — is the biggest challenge for new marketplaces. As a result, focus on one side first (usually vendors) and build from there.
Step 9: Launch and grow
First, run through this pre-launch checklist:
- □ Test vendor registration flow
- □ Test commission calculations
- □ Test payout process (Stripe Connect or manual)
- □ Test checkout with products from different vendors
- □ Test order management from vendor perspective
- □ Test shipping configuration
- □ Review vendor dashboard usability
- □ Prepare vendor onboarding documentation
- □ Set up marketplace analytics
Then, use these post-launch growth strategies:
| Strategy | How it helps |
|---|---|
| Invite existing sellers | Reach out to sellers in your niche |
| SEO | Optimize vendor store pages for search |
| Paid ads | Target potential vendors and customers |
| Referral program | Reward vendors who bring new sellers |
| Marketplace reviews | Encourage customer reviews of vendors |
Part 5: Commission Structures and Revenue Models
First, your commission structure is how you make money. Then, here are the seven most common revenue models — with typical rates per niche.
Revenue model options
| Model | How it works | Best for |
|---|---|---|
| Commission per sale | You take a percentage of each transaction | Most marketplaces — simple and scalable |
| Listing fee | Vendors pay to list products | Niche marketplaces with low-volume, high-value items |
| Subscription fee | Vendors pay a monthly/annual fee to sell | Marketplaces with committed vendors |
| Transaction fee | You charge a flat fee per transaction | Marketplaces with many small transactions |
| Tiered commission | Commission decreases as vendor sales increase | Incentivizing high-volume vendors |
| Category-based commission | Different rates for different product types | Marketplaces with varied margins |
| Customer service fee | Customer pays a transparent fee; vendor keeps 100% of listed price | Marketplaces wanting to attract vendors |
Setting commission rates (by niche)
First, research your niche’s typical range. Then, set rates that are competitive but sustainable.
| Niche | Typical commission range | Why |
|---|---|---|
| Digital products | 20–50% | High margins, low fulfilment costs |
| Physical retail | 10–25% | Lower margins, higher shipping costs |
| Services/Bookings | 15–30% | Variable margins |
| Handmade/Craft | 10–20% | Competitive space |
| B2B/Wholesale | 5–15% | High volume, lower margins |
💡 Start with a commission rate that’s competitive with similar marketplaces. However, you can always adjust later. For example, Etsy charges 6.5% + listing fees; Amazon charges 8–45% depending on category.
For a deeper look at WooCommerce revenue strategies, see our Customer Retention & Loyalty Programs guide.
Part 6: Shipping and Fulfilment in a Marketplace
First, in a marketplace, each vendor handles their own shipping. Then, here’s how to set it up for success.
Per-vendor shipping features
| Feature | What it does |
|---|---|
| Vendor shipping zones | Each vendor sets their own zones and rates |
| Vendor shipping classes | Vendors can group products with similar shipping needs |
| Flat rate per vendor | Simple fixed rate for all products |
| Weight-based shipping | Rates based on product weight |
| Free shipping thresholds | Vendors set their own free shipping minimums |
Shipping best practices for marketplaces
First, here are five practices that prevent shipping problems:
- Set minimum requirements — ensure all vendors offer reasonable shipping options
- Provide templates — give vendors shipping rate templates to speed up setup
- Review vendor shipping — check that vendors aren’t overcharging customers
- Offer tracking integration — allow vendors to add tracking numbers to orders
- Set delivery time limits — require vendors to ship within 48 hours of order
💡 However, poor shipping experiences from individual vendors can damage your marketplace’s reputation. As a result, set clear shipping standards and enforce them. For detailed shipping setups, see our WooCommerce Advanced Shipping guide.
Part 7: Vendor Management and Support
First, vendors are your customers too. Then, keeping them happy is essential for marketplace success. As a result, invest in the tools and processes that retain vendors.
Vendor management features to look for
| Feature | Why it matters |
|---|---|
| Vendor verification | Build trust with customers |
| Vendor ratings and reviews | Allow customers to rate vendors |
| Store policies | Vendors can set their own policies |
| Vacation mode | Vendors can temporarily pause sales |
| Store opening hours | For service marketplaces |
| Store notices | Vendors can communicate with customers |
| Vendor analytics | Vendors see their performance |
Vendor communication channels
| Channel | Best for |
|---|---|
| Dashboard notifications | Important updates, approvals, policy changes |
| Regular updates, newsletters, payment notifications | |
| Support tickets | Issue resolution |
| Live chat | Real-time assistance |
Handling vendor disputes
First, have clear marketplace rules and policies. Then, establish a dispute resolution process. Finally, document all communications and escalate unresolved issues to you (the platform owner). As a result, disputes are resolved fairly and consistently.
Frequently Asked Questions
Q1: Do I need a marketplace plugin to have multiple sellers?
Yes. First, a standard WooCommerce store doesn’t support multiple independent sellers. Then, you need a marketplace plugin to give each seller their own dashboard, manage commissions, and handle payouts. As a result, without a plugin, you’d be managing vendors manually — which doesn’t scale.
Q2: How much does it cost to build a WooCommerce marketplace?
First, here’s the honest breakdown:
| Cost component | Estimated cost |
|---|---|
| WooCommerce | Free |
| Marketplace plugin | $0–$199/year (free versions available) |
| Hosting | $20–$200/month (managed WordPress) |
| Stripe fees | ~2.9% + $0.30 per transaction |
| Total | As low as $20/month for a basic marketplace |
💡 Compared to SaaS marketplace platforms that cost $300–$7,200/year, WooCommerce + a marketplace plugin offers a much better cost-to-capability ratio.
Q3: Which marketplace plugin should I start with?
First, match your priority to the plugin:
- Fastest setup, polished experience: Dokan (Pro)
- Most features for free: WCFM Marketplace
- Simple, lightweight, developer-friendly: WC Vendors
- Already using YITH plugins: YITH WooCommerce Multi Vendor
Then, test the free version of your top choice before upgrading to Pro.
Q4: How do vendors get paid?
First, most plugins support three payout methods:
- Stripe Connect — automatic split payments at checkout
- PayPal Direct Pay — automated payouts
- Manual payouts — you pay vendors manually after each sale or on a schedule
As a result, Stripe Connect is the most efficient — it handles everything automatically. For accounting integration, see our WooCommerce Accounting Integration guide.
Q5: Can I charge vendors a subscription fee?
Yes. First, some plugins (like WCFM Membership) allow you to offer free and paid subscription plans for vendors. Then, this adds recurring revenue on top of commission income. As a result, you can build a hybrid model: free vendors pay higher commissions, paying vendors pay lower commissions.
Q6: What about taxes in a marketplace?
First, this is complex. Then, the general rules are:
- The marketplace owner is responsible for collecting and remitting tax on their commission
- Vendors are responsible for tax on their portion of the sale
- Always consult a tax professional for your specific situation
However, for EU marketplaces with VAT, see our WooCommerce EU VAT Guide — the OSS scheme applies to digital marketplaces.
Q7: How do I scale my marketplace?
First, here’s the stage-by-stage growth plan:
| Stage | Focus |
|---|---|
| Launch | Get first 10–20 vendors, validate the model |
| Growth | Marketing, SEO, more vendor recruitment |
| Scale | Optimize commissions, add premium features, automate more |
| Mature | Consider custom development, advanced integrations |
As a result, most successful marketplaces take 18–36 months to reach scale. Focus on vendor success first — vendors bring the products that bring the customers.
Key Takeaways
- A multivendor marketplace is a WooCommerce store where multiple independent sellers list products and you earn commissions
- Four leading plugins: Dokan (most popular, polished), WCFM (most features in free version), WC Vendors (simplest, developer-friendly), YITH (YITH ecosystem)
- Dokan starts at $149/year, **WCFM** at $99/year, WC Vendors at $99/year, **YITH** at $149/year
- 6 commission models: percentage, fixed, percentage + fixed, vendor-specific, category-specific, tiered
- Vendor payouts: Stripe Connect (recommended) or PayPal Direct Pay
- Shipping: each vendor handles their own shipping with per-vendor zones and rates
- Vendor onboarding: smooth registration, dashboard, and store setup are critical for vendor retention
- The chicken-and-egg problem: attracting both vendors and buyers is the biggest challenge
- WooCommerce + marketplace plugin offers a better cost-to-capability ratio than SaaS marketplace platforms
What’s Next?
First, you now have a complete WooCommerce marketplace system — plugin selection, setup, commissions, payouts, shipping, and vendor management. Then, your store can become a platform where multiple sellers thrive.
👉 Next in this series: WooCommerce Maintenance & Growth Guide — keeping your marketplace healthy as it scales.
What marketplace are you planning to build? Physical goods, digital products, or services? Let me know in the comments — I’d love to see what you’re working on.
Related Reading
- WooCommerce Extensions & Ecosystem — the ecosystem that powers marketplaces
- WooCommerce Advanced Shipping — per-vendor shipping configuration
- WooCommerce Accounting Integration — handle marketplace payouts and taxes
- WooCommerce EU VAT Guide — VAT compliance for EU marketplaces
- Customer Retention & Loyalty Programs — keep buyers coming back
- Choosing the Right Hosting — infrastructure that scales with vendors