
How to Automate WooCommerce Accounting with Xero & QuickBooks
Connecting WooCommerce to Xero or QuickBooks takes about 15 minutes with the right plugin. The best free option is Invoice Sync for Xero — it creates Xero invoices from WooCommerce orders automatically via OAuth 2.0. For QuickBooks, Demfilz Sync offers the same free manual sync, with automation from A$19.95/month.
But the plugin is only half the story. A proper accounting integration uses clearing accounts for each payment gateway (Stripe, PayPal) and summarized journal entries — not individual invoices for every order. Without this, your books become a mess by month 3.
The inflection point for automating your WooCommerce bookkeeping is typically between 50 and 100 orders a month. Beyond this, a structured, automated integration is not a luxury — it’s a foundational requirement for scalable growth.
This guide covers:
- Xero plugins: Invoice Sync (free), Demfilz (free/pro), MyWorks (premium), Syncible (real-time)
- QuickBooks plugins: TruSync (real-time), Demfilz (free/pro), MyWorks (premium)
- Step-by-step OAuth setup for both platforms
- Clearing account structure that accountants actually approve
- Tax mapping for EU VAT, US sales tax, and multi-currency

Let’s automate your accounting so you can focus on growing your business.
Part 1: Why Manual Bookkeeping Breaks at Scale
If you’re currently entering WooCommerce orders into Xero or QuickBooks by hand, you know the pain. Here’s what happens as your store grows:
The time problem
| Orders/month | Manual bookkeeping time | Problem |
|---|---|---|
| 50 | 2‑3 hours/week | Manageable but tedious |
| 100 | 5‑7 hours/week | Becoming a burden |
| 500 | 25‑35 hours/week | Full‑time job, impossible to sustain |
| 1,000+ | 50+ hours/week | Store can’t scale without automation |
The accuracy problem
Manual data entry introduces errors. Every time you copy a number from WooCommerce to Xero, there’s a chance of mistyping. Common errors:
- Wrong order total (off by a dollar or cent)
- Incorrect tax calculation
- Customer name misspelled (causing duplicate customer records)
- Wrong product mapped to the wrong account
- Payment gateway fees not recorded
These errors accumulate. By the time your accountant reviews your books, they’re spending hours cleaning up mistakes that could have been avoided entirely.
The visibility problem
When your accounting is behind, you can’t make good decisions. Questions like:
- “What’s my true profit margin on this product?”
- “Which marketing channel is actually profitable?”
- “How much inventory should I order?”
…become impossible to answer with confidence.
The solution: automated integration
A proper WooCommerce accounting integration automatically syncs:
- Orders (as invoices, sales receipts, or summarized entries)
- Customers (matched or created automatically)
- Payments (with gateway fees accounted for)
- Products (mapped to accounting items)
- Inventory (stock levels synced both ways)
- Taxes (mapped to correct tax codes)
- Refunds (posted as credit notes)
💡 The goal isn’t just to save time — it’s to create accurate, reconcilable financial data that you and your accountant can trust.
“If you’re still on shared hosting and your store is growing, your server might also become a bottleneck — see our Choosing the Right Hosting guide.”
Part 2: What a “Good” Accounting Integration Actually Looks Like
Before we dive into specific plugins, you need to understand what a professional accounting integration actually involves. From an accountant’s perspective, a good setup prioritizes accuracy and irreconcilability over raw data volume.
The Summarized Journal Entry Method
Many store owners assume they need to create a separate invoice in Xero or QuickBooks for every single WooCommerce order. That’s a mistake.
The gold standard for ecommerce accounting is the Summarized Journal Entry method. Instead of creating an invoice for every order, this approach groups daily sales into a single, clean entry.
Why this matters:
Individual invoices for every transaction can overwhelm systems like QuickBooks or Xero, which are not designed for high volume order processing. This can slow down your accounting software and create a cluttered, unmanageable general ledger.
The summarized method avoids this by consolidating all of a day’s transactions — sales revenue, shipping fees collected, discounts applied, and taxes — into one entry. This keeps your books tidy and efficient, whether you have ten sales or ten thousand.
The Role of Clearing Accounts
The second critical piece of a professional setup is the proper use of a clearing account for each payment gateway, such as Stripe or PayPal.
What many stores do wrong:
They map payments directly to their sales revenue account. This is incorrect because:
- It ignores the timing difference between a customer’s purchase and the gateway’s payout
- It completely overlooks gateway processing fees
This practice makes accurate payment reconciliation nearly impossible.
What a clearing account does:
A clearing account acts as a temporary holding area or a financial waiting room. Gross sales from a payout batch go into the clearing account first. Then, when the payment gateway actually pays you (minus fees), you reconcile the clearing account against the bank deposit.
“A proper clearing account setup also depends on your payment gateway configuration. If you’re using digital products, read our Optimising Checkout for Digital Products guide first.”
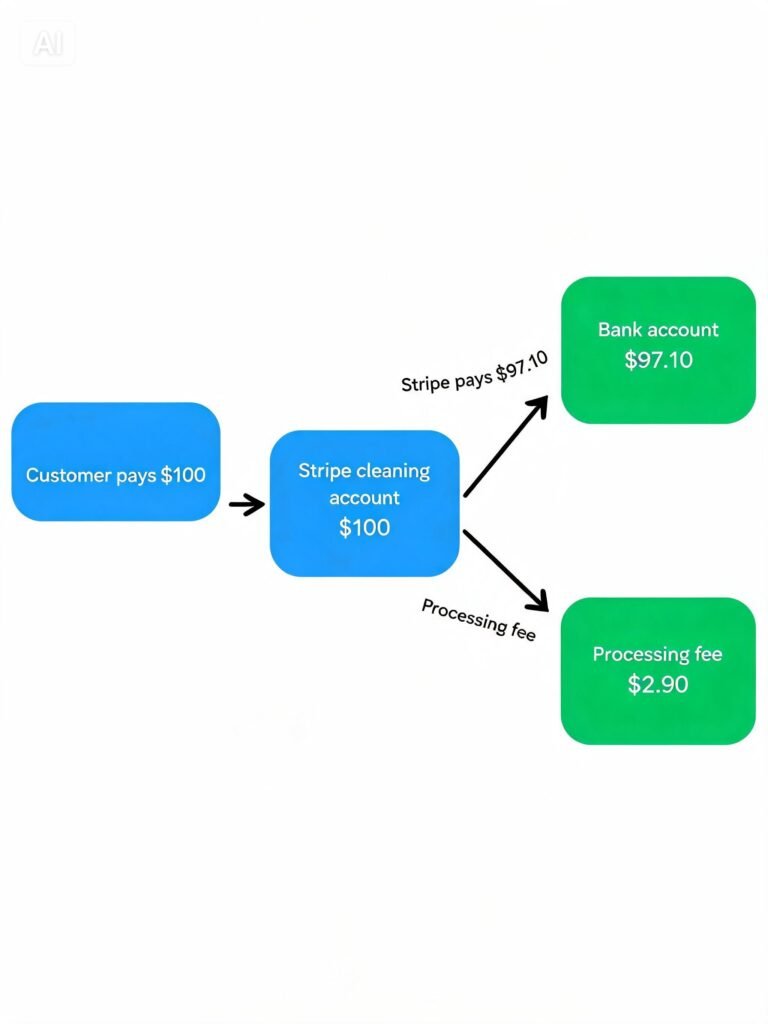
Example flow:
- Customer pays $100 via Stripe
- WooCommerce sends $100 to your Stripe clearing account in Xero/QuickBooks
- Stripe takes $2.90 in fees and pays you $97.10
- You reconcile the clearing account: $100 debit (sales), $97.10 credit (bank deposit), $2.90 debit (processing fee expense)
This creates a clean, auditable trail that your accountant will love.
💡 A good accounting integration plugin handles both summarized entries and clearing accounts automatically. You don’t need to set these up manually — you just need to choose a plugin that supports them.
What Accountants actually want to see in your woocommerce books
Most WooCommerce store owners set up an integration, sync a few orders, and assume everything is fine. Then their accountant reviews the books and finds:
- Duplicate customer records — because the plugin created a new contact for every order instead of matching by email
- Gateway fees missing — Stripe took $2.90 per transaction, but the books show the full $100 as revenue
- Tax codes mismatched — WooCommerce charged 20% VAT, but Xero recorded it as “No VAT”
- Refunds not synced — credit notes missing, so revenue is overstated
A 2026 survey of e-commerce accountants found that 68% of WooCommerce stores have at least one reconciliation error in their first 6 months of integration. The fix isn’t a better plugin — it’s a better setup.
Here’s what your accountant wants to see:
- One clearing account per gateway — Stripe Clearing, PayPal Clearing, etc.
- Summarized daily entries — not 500 individual invoices per month
- Consistent tax mapping — WooCommerce tax class → Xero/QuickBooks tax code
- Refund sync enabled — credit notes for every WooCommerce refund
- Customer matching by email — no duplicates, no manual cleanup
💡 Check your setup now: Open your Xero or QuickBooks file. Look at the last 30 days. Can you reconcile every Stripe payout to the cent? If not — you need a clearing account.
Part 3: Xero Integration – Best Plugins
Xero is one of the most popular cloud accounting platforms, particularly for businesses outside the US. Here are the best WooCommerce integration plugins for Xero in 2026.
Plugin comparison
| Plugin | Price | Best for | Key features |
|---|---|---|---|
| Invoice Sync for Xero | Free (from WooCommerce.com) | Simple stores, basic invoicing | Auto‑creates Xero invoices from orders; free; OAuth 2.0 |
| Demfilz Sync for Xero | Free / A$19.95/month pro | Budget‑conscious stores | Free manual sync; pro adds automation, bulk backfill, inventory sync |
| Xero Sync by MyWorks | Free plugin + paid service | Complex stores needing full customisation | Two‑way sync: orders, customers, products, inventory; sync as often as every 5 minutes; 25+ extension compatibility |
| Syncible Sync for Xero | Free | Real‑time sync | Posts orders as Xero invoices in real time via webhooks |
| Combidesk – Xero for WooCommerce | Paid | Multi‑platform stores | Supports WordPress 6.9.4 and WooCommerce 10.7.0 |
which xero plugin is right for you?
Choose Invoice Sync for Xero if: you have under 100 orders/month and just need basic invoices in Xero. It’s free, uses OAuth 2.0, and takes 10 minutes to set up.
Choose Demfilz Sync for Xero if: you want a free manual sync now, but plan to upgrade to automation later. The pro version (A$19.95/month) adds automatic sync, refunds, and inventory backfill — cheaper than MyWorks for growing stores.
Choose Xero Sync by MyWorks if: you have complex needs — 500+ orders/month, custom fields (tracking numbers, PO numbers), or you use 25+ WooCommerce extensions like Sequential Order Numbers or Product Bundles. The free plugin + paid service model means you pay for what you use.
Choose Syncible Sync for Xero if: you need real-time sync. It uses webhooks to post orders to Xero the moment they’re placed — no 5-minute delay. Best for high-volume stores where cash flow visibility matters.
Deep dive: Invoice Sync for Xero (Free)
Invoice Sync for Xero is the simplest option. It automatically creates Xero invoices whenever a customer places an order — contacts, line items, taxes, shipping, fees, and payment records are all included with no manual data entry required.
Requirements before setup:
- An active Xero subscription (or a free Xero developer account with a demo organization for testing)
- Access to the Xero Developer Portal
- Your WordPress site must be accessible over HTTPS (Xero requires a secure redirect URI)
Setup steps:
- Go to the Xero Developer Portal and create a new app:
- Copy your Client ID and generate a Client Secret
- In your WordPress admin, go to Invoice Sync for Xero > Settings, paste your credentials, and connect
- Configure your default settings (tax rates, invoice status, etc.)
- Test with a sample order
💡 Invoice Sync for Xero uses OAuth 2.0, so you don’t need to share your Xero password with the plugin.
Deep dive: Xero Sync by MyWorks (Premium)
If you need more than basic invoicing, Xero Sync by MyWorks is the most powerful option. It’s a robust two‑way sync that keeps your orders, inventory, and payments up to date — as often as every 5 minutes.
Key features:
- Sync orders as invoices, sales receipts, or estimates — you choose
- Two‑way product and inventory sync
- Payment method mapping — payments sent to the correct bank account in Xero
- Custom field mapping — tracking numbers, delivery dates, PO numbers
- Works with 25+ WooCommerce extensions (Sequential Order Numbers, Product Bundles, COGS, etc.)
- Sync as often as every 5 minutes
Pricing: The plugin itself is free to download, but requires a paid MyWorks account for the sync service.
Deep dive: Demfilz Sync for Xero (Freemium)
Demfilz Sync for Xero is a good middle‑ground option. It connects your WooCommerce store to your Xero organization so you stop re‑keying sales. It posts orders as Xero invoices (or quotes), matches or creates the contact, and can read stock‑on‑hand back from Xero.
Free features:
- One‑click OAuth 2.0 connection to your Xero organization
- Push an order to Xero with a button on the order screen
- Create or match the contact in Xero automatically
- Map a default income account and GST tax rates
- Pull current stock‑on‑hand from Xero for a product
Pro features (A$19.95/month):
- Automatic order sync when an order reaches a chosen status
- Bulk / historical order backfill
- Scheduled inventory sync across all products
- Refunds / credit notes to Xero
- Auto‑retry of failed syncs with email alerts
💡 The free version handles manual sync (you click a button on each order). The pro version automates everything.
Part 4: QuickBooks Online Integration – Best Plugins
QuickBooks Online is the dominant accounting platform in the US and many other markets. Here are the best WooCommerce integration plugins for QuickBooks in 2026.
Plugin comparison
Deep dive: TruSync (Real‑time Sync)
TruSync connects your WooCommerce store to the TruSync cloud service, which automatically posts your orders and inventory to QuickBooks Online so your accounting records stay in sync without manual data entry.
What it syncs:
- Order sync — each WooCommerce order is posted to QuickBooks Online as the matching sales document, in real time via WooCommerce webhooks
- Inventory sync — stock changes flow between QuickBooks Online and WooCommerce so quantities match in both systems
- Payment mapping — order payment methods are mapped to the correct QuickBooks Online deposit accounts
- Sales tax mapping — order tax lines are mapped to your QuickBooks Online tax jurisdictions
- Product matching — your WooCommerce products are matched to existing QuickBooks Online items, with historical order backfill available
Requirements:
Setup steps:
- Install and activate the TruSync plugin
- Click the TruSync menu item in the admin sidebar
- Click Connect to authorise the connection to your TruSync account and start syncing
💡 TruSync processes order and inventory on their cloud service, not on your WordPress server. This means better performance for your store — no additional load on your hosting.
Deep dive: Demfilz Sync for QuickBooks (Freemium)
Demfilz Sync for QuickBooks uses the official Intuit QuickBooks Online Accounting API with secure OAuth 2.0.
Free features:
- One‑click OAuth connection to your QuickBooks Online company
- Push an order to QuickBooks as a sale (Invoice / Sales Receipt / Estimate) with a button on the order screen
- Create or match the customer in QuickBooks automatically (matched by display name)
- Map a default product/service item and tax codes
- Pull current stock‑on‑hand from QuickBooks for a product
- Sync log of every attempt
Pro features (A$19.95/month):
- Automatic order sync when an order reaches a chosen status
- Bulk / historical order backfill
- Scheduled inventory sync across all products
- Refunds / credit memos to QuickBooks
- Per product / per‑tax‑class tax mapping
- Auto‑retry of failed syncs with email alerts
Setup steps:
- Install and activate the plugin (WooCommerce must be active)
- Go to WooCommerce QuickBooks Sync
- Create an app in the Intuit developer portal and paste the Client ID and Client Secret, using the redirect URI shown on the Connection tab
- Choose Production or Sandbox mode
- Click Save & Connect to QuickBooks, approve access, then return to the Mapping tab
- Set your default product/service item and tax codes on the Mapping tab
- Open any order and click Sync to QuickBooks
Deep dive: MyWorks Sync for QuickBooks (Premium)
MyWorks Sync for QuickBooks is the premium option, offering the same robust functionality as the Xero version. It connects your WooCommerce store to QuickBooks Online and provides full two‑way sync.
Key features:
- Sync orders as invoices, sales receipts, or estimates
- Two‑way product and inventory sync
- Payment method mapping
- Custom field mapping
- Support for multiple WooCommerce stores connected to a single QuickBooks company
Pricing: Free plugin + paid MyWorks service.
Part 5: Step‑by‑Step – Setting Up a Xero Integration
Let’s walk through setting up a Xero integration using Invoice Sync for Xero as our example. This is the simplest free option and works for most stores.
Before you begin
Make sure you have:
- An active Xero subscription (or a free Xero developer account with a demo organization for testing)
- Access to the Xero Developer Portal — you’ll need to log in with the same Xero account you use for your business organization
- Your WordPress site accessible over HTTPS (Xero requires a secure redirect URI)
- Your WordPress admin URL (typically
https://yourstore.com/wp-admin/)
Step 1: Create a Xero app
- Go to the Xero Developer Portal at
https://developer.xero.com/app/manageand sign in with your Xero account - Click New app
- Fill in the form:
- App name — e.g., “My Store – WooCommerce”
- Integration type — Select Web app
- Will you use Xero data to train an AI model? — Select No
- Do you understand and agree to meet Xero’s minimum security requirements? — Tick this checkbox
- Company or application URL — Enter your store’s homepage URL
- OAuth 2.0 redirect URI — Enter your WordPress admin URL with a trailing slash:
https://yourstore.com/wp-admin/ - I have read and agree to the Xero Developer Platform Terms — Tick this checkbox
- Click Create app
Step 2: Copy your credentials
- After the app is created, you’re taken to the app’s detail page
- Click Configuration in the left sidebar
- Confirm the redirect URI matches your WordPress admin URL
- Copy the Client ID and keep it safe
- Click Generate a secret. Xero will display the Client Secret once — copy it immediately and store it securely. If you navigate away without copying it, you’ll need to generate a new one
Step 3: Configure the plugin
- In your WordPress admin, go to WooCommerce → Settings → Xero Invoice Sync tab
- Enter your Client ID and Client Secret
- Configure your default settings:
- Invoice status — Draft, Submitted, or Authorized
- Default tax rate — Choose the appropriate tax rate for your products
- Default income account — Choose where revenue should be recorded
- Save your settings
Step 4: Test the connection
- Place a test order in your store
- Go to the order in WooCommerce admin
- The plugin should automatically create an invoice in Xero
- Check your Xero account — the invoice should appear with all line items, customer details, and tax correctly applied
💡 If you’re using a Xero demo organization, you can test the entire flow without affecting your real accounting data.
Part 6: Step‑by‑Step – Setting Up a QuickBooks Integration
Let’s walk through setting up a QuickBooks integration using Demfilz Sync for QuickBooks as our example. This is a good free option that’s easy to set up.
Before you begin
Make sure you have:
- An active QuickBooks Online account
- Access to the Intuit Developer Portal
- Your WordPress site accessible over HTTPS
Step 1: Create a QuickBooks app
- Go to the Intuit Developer Portal at
https://developer.intuit.com - Sign in with your QuickBooks account
- Create a new app:
- App name — e.g., “My Store – WooCommerce”
- Platform — Select Web
- Redirect URI — Enter the URI shown in the plugin’s Connection tab
- Copy your Client ID and Client Secret
Step 2: Configure the plugin
- Install and activate the Demfilz Sync for QuickBooks plugin
- Go to WooCommerce QuickBooks Sync
- Paste your Client ID and Client Secret
- Choose Production or Sandbox mode
- Click Save & Connect to QuickBooks, approve access, then return to the Mapping tab
- Set your default product/service item and tax codes on the Mapping tab
Step 3: Test the connection
- Open any order
- Click Sync to QuickBooks
- Check your QuickBooks account — the order should appear as a sale
💡 The free version requires manual sync (you click a button on each order). If you want automatic sync, you’ll need the pro version.
Part 7: Choosing the Right Plugin for Your Store
With so many options, how do you choose? Here’s a decision framework.
Decision matrix
| Your situation | Recommended plugin | Why |
|---|---|---|
| Small store (<100 orders/month), simple needs | Invoice Sync for Xero (free) or Demfilz Sync for QuickBooks (free) | Basic invoicing is enough; free tier works |
| Growing store (100‑500 orders/month) | Demfilz Sync (pro) or TruSync | Automated sync, inventory management, better reporting |
| Complex store with custom fields, multiple extensions | Xero Sync by MyWorks or MyWorks Sync for QuickBooks | Full customisation, 25+ extension compatibility, custom field mapping |
| Need real‑time sync | Syncible Sync for Xero (real‑time) or TruSync (real‑time via webhooks) | Orders sync instantly |
| Need two‑way inventory sync | Xero Sync by MyWorks, MyWorks Sync for QuickBooks, or TruSync | Stock levels stay in sync both ways |
| Multiple stores to one accounting company | Xero Sync by MyWorks or MyWorks Sync for QuickBooks | Supports multiple WooCommerce stores to a single Xero/QuickBooks company |
Key questions to ask yourself
- How many orders do you process per month? — If you’re under 50, manual entry might still be okay. Above 100, automation becomes essential.
- Do you need two‑way sync? — If you manage inventory in Xero or QuickBooks and want stock levels to flow back to WooCommerce, you need a plugin that supports this.
- Do you need real‑time sync? — For most stores, syncing every 5‑15 minutes is sufficient. Real‑time sync is only necessary for high‑volume or time‑sensitive operations.
- What’s your budget? — Free options exist, but they’re limited. Expect to pay $10‑30/month for full automation.
- Do you use any WooCommerce extensions that need compatibility? — MyWorks Sync supports 25+ extensions out of the box. If you use Sequential Order Numbers, Product Bundles, or COGS, this is important.
- Do you need historical order backfill? — If you want to sync past orders into Xero/QuickBooks, look for a plugin that supports bulk backfill.
Part 8: Common Mistakes and How to Avoid Them
Mistake 1: Syncing every order as a separate invoice
Problem: This clutters your accounting software and slows it down. Xero and QuickBooks aren’t designed for high‑volume individual invoice processing.
Solution: Use the Summarized Journal Entry method where possible. Consolidate daily sales into a single entry.
Mistake 2: Mapping payments directly to revenue
Problem: This ignores timing differences and gateway fees, making reconciliation nearly impossible.
Solution: Use clearing accounts for each payment gateway. Gross sales go to the clearing account first, then you reconcile against the bank deposit.
Mistake 3: Not mapping tax codes correctly
Problem: Wrong tax rates in your accounting software can lead to incorrect tax filings.
Solution: Ensure your WooCommerce tax rates match your Xero/QuickBooks tax codes. Most plugins allow you to map tax classes to specific accounting codes.
Mistake 4: Forgetting about refunds
Problem: Refunds in WooCommerce don’t automatically create credit notes in your accounting software.
Solution: Choose a plugin that supports refund sync (Demfilz Pro, MyWorks Sync, TruSync).
Mistake 5: Not testing in sandbox mode first
Problem: A misconfigured integration can flood your real accounting data with test orders.
Solution: Always test in sandbox mode first. Xero offers demo organisations. QuickBooks offers sandbox companies.
Mistake 6: Assuming “set and forget”
Problem: Your accounting integration needs occasional maintenance — rate changes, new products, new payment methods.
Solution: Review your integration settings quarterly. Check that new products are mapped correctly and that tax rates are still current.
how to test your integration without breaking your books
The biggest fear store owners have is: “What if I mess up my real accounting data?”
Here’s the safe way to test any WooCommerce accounting integration:
Step 1: Use a sandbox/demo environment
- Xero: Create a free demo organization in the Xero Developer Portal. You can sync test orders without affecting your real books.
- QuickBooks: Use Sandbox mode in the Intuit Developer Portal. Demfilz Sync and MyWorks both support Sandbox.
Step 2: Start with 5 test orders
- Create 5 orders in WooCommerce: one paid, one refunded, one with a discount, one with a coupon, one with tax.
- Sync them manually (not automatically).
- Check each one in Xero/QuickBooks: customer created? Tax correct? Payment recorded? Refund posted?
Step 3: Set up clearing accounts BEFORE going live
- If you sync 1,000 orders directly to revenue, fixing it later takes days.
- Set up clearing accounts first. Then sync 10 real orders. Reconcile manually. If it matches — scale up.
Step 4: Enable auto-retry
- Every plugin fails sometimes. Power outages, API changes, Xero maintenance windows.
- Choose a plugin with auto-retry + email alerts (Demfilz Pro, MyWorks, TruSync all have this).
- Without auto-retry, you’ll discover missing orders weeks later — during tax season.
❓ Frequently Asked Questions
Q1: Do I need both Xero/QuickBooks AND WooCommerce to manage my accounting?
No. Your accounting software (Xero or QuickBooks) is your source of truth for financial data. WooCommerce is your source of truth for sales data. The integration keeps them in sync.
Q2: Can I use Xero and QuickBooks at the same time?
You can, but it’s not recommended. Choose one accounting platform and stick with it. Running both creates duplication and reconciliation headaches.
Q3: How often should orders sync?
| Frequency | Best for |
|---|---|
| Real‑time (webhooks) | High‑volume stores, time‑sensitive reporting |
| Every 5‑15 minutes | Most stores |
| Hourly | Smaller stores, budget options |
| Daily | Stores that don’t need up‑to‑the‑minute data |
Q4: What about multi‑currency?
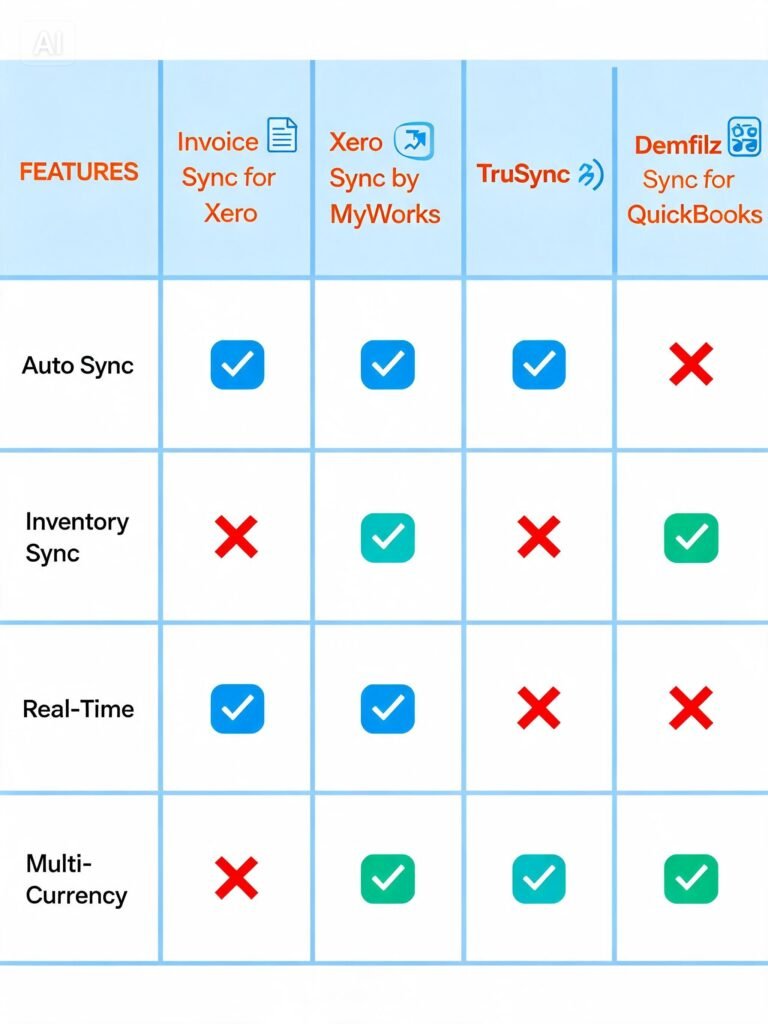
Xero and QuickBooks both support multi‑currency, but you need to ensure your integration plugin supports it. MyWorks Sync and TruSync support multi‑currency. Check before purchasing.
Q5: Do I need an accountant to set this up?
Not necessarily. The plugins are designed to be user‑friendly. However, having an accountant review your setup (especially the clearing accounts and tax mapping) is recommended.
Q6: What happens if a sync fails?
Most premium plugins (Demfilz Pro, MyWorks Sync, TruSync) include auto‑retry with email alerts. Free versions may require manual intervention.
Q7: Can I sync historic orders?
Yes, if you choose the right plugin. Demfilz Pro, MyWorks Sync, and TruSync all support bulk historical order backfill.
Q8: Will this work with my WooCommerce extensions?
Most plugins work with standard WooCommerce. MyWorks Sync specifically supports 25+ extensions including Sequential Order Numbers, Product Bundles, and COGS.
Q9: Is my data secure?
All plugins listed use OAuth 2.0 for authentication — you never share your accounting password with the plugin. OAuth tokens are stored encrypted in your WordPress database. No accounting data is stored in WordPress with TruSync.
Q10: How much does this cost?
| Plugin | Monthly cost | Annual cost |
|---|---|---|
| Invoice Sync for Xero | $0 | $0 |
| Demfilz Sync (free) | $0 | $0 |
| Demfilz Sync (pro) | A$19.95 | A$239.40 |
| TruSync | Varies | Varies (service‑based) |
| MyWorks Sync | Varies | Varies (service‑based) |
Q11: What’s the difference between an invoice, a sales receipt, and an estimate in this context?
| Document type | When to use |
|---|---|
| Invoice | For orders that haven’t been paid yet (or are paid later) |
| Sales Receipt | For orders that are already paid (instant payment) |
| Estimate | For pre‑order quotes, not yet confirmed |
Most plugins let you choose which document type to create.
Q12: I use Xero. Do I need a Xero developer account just to set this up?
Yes, but it’s free and only takes a few minutes. You create a Xero app in the developer portal to get the Client ID and Client Secret needed for OAuth authentication.
Q13: I use QuickBooks Desktop, not Online. Can I integrate?
Not easily. Most plugins only support QuickBooks Online. QuickBooks Desktop requires a different integration method (Web Connector). If you’re on Desktop, consider migrating to Online or using a specialised tool.
Q14: How do I handle payment gateway fees in my accounting?
This is where clearing accounts come in. A good integration plugin will:
- Record the gross sale amount in a clearing account
- Record the gateway fee as an expense
- Record the net amount as the actual bank deposit
This creates a clean, reconcilable trail.
Q15: What if I sell internationally with different tax rates?
Most plugins support tax mapping per product or per tax class. You can map different WooCommerce tax classes to different Xero/QuickBooks tax codes. This is essential for EU VAT compliance.
real-world e[ample: how a 500-order store reconciles in 15 minutes
Here’s a real workflow from a WooCommerce store doing 500 orders/month with Stripe and PayPal:
Daily (5 minutes):
- Demfilz Pro automatically syncs all new orders to Xero as a summarized daily entry
- Stripe payout arrives → you reconcile the Stripe Clearing account (gross sales − fees = bank deposit)
Weekly (10 minutes):
- Check sync log for failed orders → retry
- Verify customer matching — no duplicates in Xero
- Check refund sync — credit notes match WooCommerce refunds
Monthly (30 minutes):
- Export Xero P&L → compare to WooCommerce reports
- Review tax mapping — any new products with wrong tax codes?
- Update inventory sync if you added new products
The result: clean books, no month-end panic, accountant happy.
💡 The key difference: summarized entries + clearing accounts. Without these two things, the same store would spend 20+ hours/month on bookkeeping.
What’s Next?
You now have a complete WooCommerce accounting integration system. Your store can automatically sync orders, customers, products, and inventory with Xero or QuickBooks — saving hours of manual bookkeeping every week.
👉 Next article in this series: WooCommerce Product Landing Pages & Pre‑orders
We’ll cover how to create high‑converting product landing pages, set up pre‑orders for upcoming products, and build anticipation before launch.
What accounting software do you use — Xero or QuickBooks? Have you tried integrating it with WooCommerce yet? Let me know in the comments.
📌 Key Takeaways (for skimmers)
- The inflection point for automating WooCommerce bookkeeping is typically between 50 and 100 orders a month.
- A good integration uses summarized journal entries and clearing accounts — not individual invoices for every order.
- Xero plugins: Invoice Sync for Xero (free), Demfilz Sync for Xero (free/pro), Xero Sync by MyWorks (premium), Syncible Sync for Xero (real‑time).
- QuickBooks plugins: TruSync (real‑time), Demfilz Sync for QuickBooks (free/pro), MyWorks Sync for QuickBooks (premium).
- Key features to look for: automatic sync, two‑way inventory sync, refund support, historical backfill, multi‑currency, custom field mapping.
- Common mistakes: syncing every order as a separate invoice, mapping payments directly to revenue, forgetting about refunds, not testing in sandbox mode.
- Clearing accounts are essential for reconciling payment gateway fees accurately.
🔗 Internal Links
- Article #1 – WooCommerce in 2026 – Market Share & Trends
- Article #2 – Installing WooCommerce & Setup Wizard
- Article #5 – Optimising Checkout for Digital Products
- Article #12 – WooCommerce Security & Performance
- You are here – WooCommerce Accounting Integration