
The checkout page is where revenue either happens or disappears. Industry data consistently shows that roughly 70% of online shopping carts are abandoned before purchase, and a significant portion of that abandonment happens at checkout. For a WooCommerce store selling digital products (like WordPress plugins, e‑books, or software), an unnecessarily complex checkout directly invites customers to leave.
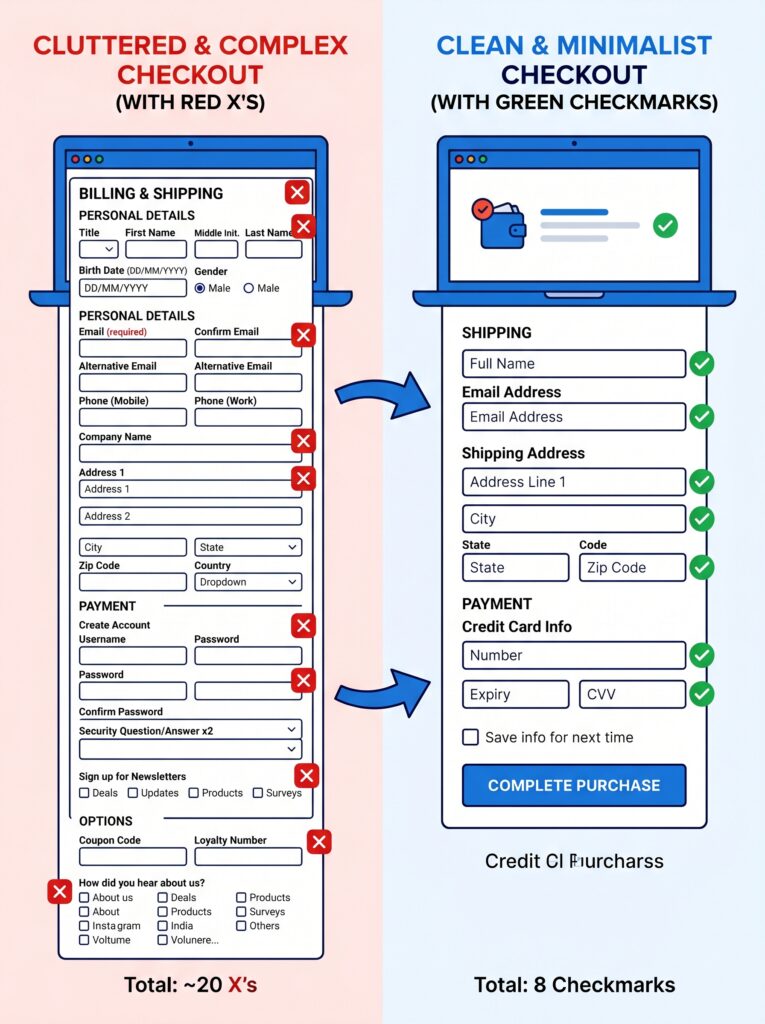
A standard checkout page asks for a shipping address, a company name, a phone number, and sometimes forces account creation. None of that is needed for a digital purchase. Every extra field you ask for adds friction. Removing unnecessary fields can lower cart abandonment and improve the user experience**.
In this guide, I’ll show you how to strip down your WooCommerce checkout to the absolute minimum needed for digital sales, add trust signals that convert, and measure your improvements. Let’s turn your checkout page into a conversion machine.
Part 1: The Block Checkout – Why the Old Methods No Longer Work
In recent years, WooCommerce introduced a highly modern, block‑based checkout system that is editable via the built‑in Gutenberg block editor. WooCommerce is moving toward block‑based checkout as the recommended default for new stores.
The block checkout is WooCommerce’s new checkout experience, built entirely in React as a Gutenberg block. It replaces the traditional shortcode‑based checkout (woocommerce/templates/checkout/ that developers have customised for years. The shift began in earnest with WooCommerce 8.3, when the block checkout became the default for new installations. As of WooCommerce 9.x, existing stores are prompted to migrate. The old shortcode checkout has not been removed – WooCommerce calls it the “classic checkout” – but it is now officially in maintenance‑only mode, meaning it will receive security fixes but no new features.
What this means for you
- Old checkout: PHP template rendered server‑side, customised via hooks and template overrides in your theme, styled with CSS targeting WooCommerce’s class structure.
- New block checkout: React application rendered client‑side after initial PHP handoff, customised via block filters and inner blocks, styled with
theme.jsonor block‑specific CSS.
The user‑facing appearance can be made identical. The developer experience is fundamentally different. And the plugin compatibility implications are significant. If you have customised your checkout using PHP hooks like woocommerce_checkout_fields, those modifications will not work with the block checkout. That’s why this guide focuses on the native block configuration and a few recommended plugins.
If you still see the old shortcode checkout
If your checkout page still shows a single block that says “Classic Shortcode”, you need to migrate. Here’s how:
- Go to Pages → All Pages and edit the Checkout page.
- In the List View, select the Checkout block.
- Click the “Transform” button (leftmost in the block toolbar).
- Choose the modern Checkout block from the list.
- Save the page.
Now you’re working with the new block‑based checkout – and you can customise it visually without writing a single line of code.
Part 2: Visual Customisation – No Code Required
The block checkout is structured as a hierarchy of inner blocks, each responsible for a specific section of the checkout page. You can rearrange, hide, or style these blocks directly in the Gutenberg editor.
Inner block structure of the Checkout block
| Block | Handles | Can you edit it? |
|---|---|---|
woocommerce/checkout | Outer container | Block attributes |
woocommerce/checkout-fields-block | All form fields wrapper | Limited direct edit |
woocommerce/checkout-contact-information-block | Email field | Yes, via inner blocks |
woocommerce/checkout-shipping-address-block | Shipping address fields | Field visibility settings |
woocommerce/checkout-billing-address-block | Billing address fields | Field visibility settings |
woocommerce/checkout-shipping-methods-block | Shipping method selection | Via shipping zones |
woocommerce/checkout-payment-block | Payment method selection | Via payment gateway integration |
woocommerce/checkout-order-summary-block | Order summary sidebar | Can add inner blocks |
woocommerce/checkout-actions-block | Place Order button | Limited |
Step‑by‑step visual customisation
- Go to Pages → All Pages and edit your Checkout page.
- Open the List View (top‑left icon in the editor toolbar). This shows you all inner blocks in a tree structure.
- You can now:
- Reorder sections – Drag and drop the order summary above the form fields, or move the payment block earlier.
- Hide blocks – Select a block (e.g., “Additional information”) and remove it.
- Configure field visibility – Select the Billing Address block. In the right sidebar, toggle optional fields like “Phone” and “Company” on or off.
- Change the header – The Checkout template intentionally shows a simplified header (only your site logo and title) to reduce distractions. You can customise this in the Site Editor if needed.
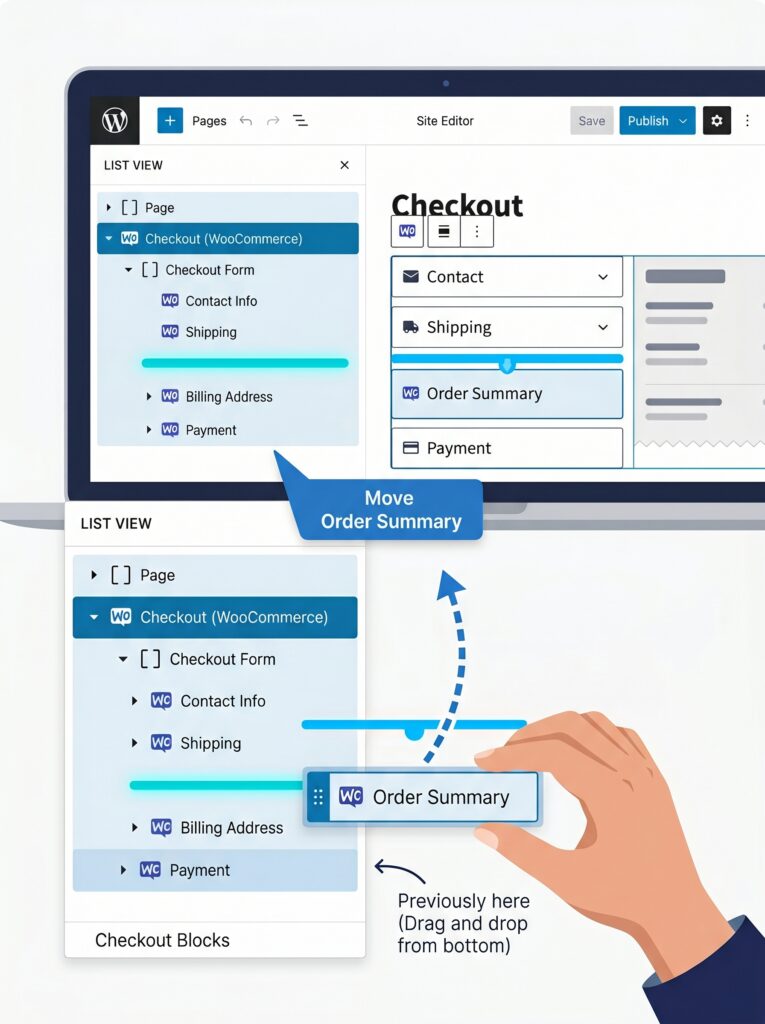
Each block can be moved, hidden, or configured within the block editor. You can drag the order summary above the form fields, remove the “Additional information” block, or reorder sections, all without writing code. This is the core UX improvement over the old template system, where reordering sections required PHP hook priority manipulation.
💡 If you sell only digital products, you can completely remove the Shipping Address block by deleting it from the List View. However, the Billing Address block cannot be removed entirely because payment gateways and tax calculations require it.
Part 3: Optimising for Digital Products – Removing Shipping Fields
If you sell digital products (plugins, e‑books, software), you do not need shipping address fields. Removing them is one of the fastest conversion improvements you can make. Every field you remove reduces friction.
Option 1: Using the block editor (easiest)
- Edit your Checkout page in the Gutenberg editor.
- In List View, locate the Shipping Address block.
- Click the three dots next to it and select “Remove block”.
- Save the page.
That’s it. The shipping section disappears completely.
But there’s a catch. Even if you remove the Shipping Address block from the editor, some payment gateways and tax plugins still expect a country and postcode to calculate VAT or validate cards. To avoid errors, you can use a small code snippet to hide shipping fields without breaking functionality.
Option 2: Using the woocommerce_checkout_fields filter (for billing address adjustments)
For a more precise approach that works even when you keep the block, you can use the woocommerce_checkout_fields filter to control individual fields. Place this snippet in your child theme’s functions.php or via a code snippet plugin:
php
add_filter( 'woocommerce_checkout_fields', function( $fields ) {
    // Remove company field if not needed
    unset( $fields['billing']['billing_company'] );
    // Remove phone field if you don't need it
    unset( $fields['billing']['billing_phone'] );
    // Remove order notes
    unset( $fields['order']['order_comments'] );
    return $fields;
} );
Option 3: Remove all fields except country and name (for digital‑only stores)
For a truly minimalist checkout, you can hide most billing fields while keeping only what’s necessary. Using the woocommerce_get_country_locale filter, you can set address‑related fields to be hidden:
php
add_filter('woocommerce_get_country_locale', function( $locale ) {
    // Apply to all countries (use specific country codes for per‑country control)
    foreach( $locale as $country_code => &$fields ) {
        $fields['address_1']['hidden'] = true;
        $fields['address_1']['required'] = false;
        $fields['city']['hidden'] = true;
        $fields['city']['required'] = false;
        $fields['postcode']['hidden'] = true;
        $fields['postcode']['required'] = false;
        $fields['state']['hidden'] = true;
        $fields['state']['required'] = false;
        $fields['company']['hidden'] = true;
        $fields['company']['required'] = false;
    }
    return $locale;
});
⚠️ Important: Billing address fields are considered essential by WooCommerce. Payment gateways need your address for fraud detection and card validation. Tax calculations require a full address to calculate taxes correctly. The WooCommerce team does not encourage removing all fields for these reasons. If you sell digital products to EU customers, you still need a billing country for VAT purposes. Use country‑specific rules instead of a global blanket removal.
Option 4: Use a plugin (no code)
Several free plugins can manage checkout fields for the block checkout without coding:
- Checkout Fields for Blocks – Allows adding new fields (text input, checkbox, select, textarea) to the WooCommerce block‑based checkout. You can set field validation, display options (order confirmation, admin order, My Account), and CSS classes.
- Checkout Field Editor – A popular plugin for customising both classic and block checkout fields. It provides a drag‑and‑drop interface to reorder, add, or remove fields.
If you need conditional logic (show/hide fields based on cart contents, shipping method, or user role), the PRO add‑ons for these plugins add that functionality.
Disabling the shipping calculator
If you want to remove shipping entirely from the cart page:
- Go to WooCommerce → Settings → Shipping.
- Uncheck “Enable the shipping calculator on the cart page”.
- Click “Save changes”.
Part 4: Adding Trust Signals to Your Checkout
Trust is the currency of e‑commerce. A streamlined checkout is great, but if customers don’t feel safe entering their payment details, they will abandon. Adding trust signals directly on the checkout page can significantly increase conversions.
What to add
| Trust signal | Where to place | Effect |
|---|---|---|
| Payment method icons (Visa, Mastercard, PayPal, Apple Pay) | Near the payment block | Reassures customers their preferred method is accepted |
| Security badges (SSL, Norton, McAfee) | Below the “Place Order” button | Signals that their data is encrypted and safe |
| Guarantee text (“30‑day money‑back guarantee”) | Near the total amount | Reduces perceived purchase risk |
| Live chat or support contact | Small text link near billing | Offers an immediate way to resolve hesitations |
| Returns/refund policy summary | Linked text near the order summary | Clarifies what happens if something goes wrong |
How to add trust badges (no code)
Since the checkout page is built with blocks, you can add any block anywhere. Here’s how:
- Edit your Checkout page.
- Below the “Place Order” button, add an Image block and upload your security badge image.
- Or add a Paragraph block with a short guarantee message: “🔒 Secure checkout. Your payment information is encrypted.”
- Add a Spacer block for breathing room.
- Save the page.
For SSL badges (like Norton or McAfee), you usually get an HTML embed code. Use a Shortcode or Custom HTML block to paste it.
💡 Avoid overloading the checkout with too many badges – two or three well‑placed trust indicators are more effective than ten small icons.
Part 5: Guest Checkout vs. Account Creation
One of the biggest conversion killers is forcing customers to create an account before purchasing. Industry data shows that a checkout that requires account creation drives away about 24% of shoppers.
WooCommerce allows guest checkout by default, but here’s how to ensure it’s enabled:
- Go to WooCommerce → Settings → Accounts & Privacy.
- Under “Guest checkout”, check “Allow customers to place orders without an account”.
- Uncheck “When creating an account, automatically generate username from customer email” and “When creating an account, automatically generate customer password” unless you have a specific reason for them.
- Save changes.
With guest checkout enabled, your checkout will show an option to “Create an account?” after the order is placed – not before. This subtle shift massively reduces friction.
Part 6: Speed Optimisation for Checkout
The block checkout is a React application rendered client‑side. While it improves flexibility and user experience, it can be slower than the old PHP template if not optimised.
Why checkout speed matters
According to industry research, a one‑second delay in page load time can reduce conversions by up to 7%–20%. For a store doing significant revenue, that’s a huge loss. The block checkout loads additional scripts and styles compared to the classic checkout, so optimisation is not optional – it’s essential.
How to speed up your checkout
| Action | How to do it |
|---|---|
| Remove unnecessary blocks | Delete the “Additional information” and “Order notes” blocks if you don’t need them. Fewer blocks = faster rendering. |
| Use a fast hosting provider | Managed WordPress hosts (like SiteGround or Kinsta) handle the React bundle more efficiently than budget shared hosting. |
| Enable caching for scripts | Use a caching plugin like WP Rocket or Litespeed to minify and combine CSS/JS files that are not dynamic. |
| Optimise images | Keep trust badges under 20KB. Use WebP format. |
| Use a CDN | Cloudflare or other CDNs reduce latency by delivering static assets from servers close to your customer. |
| Update PHP version | Run PHP 8.1 or higher – WooCommerce 9.x is optimised for PHP 8.x. |
After making speed improvements, test your checkout using Google PageSpeed Insights (mobile and desktop) and GTmetrix. Focus on improving the Largest Contentful Paint (LCP) and reducing Total Blocking Time (TBT).
Part 7: Testing Your Checkout – Catch Problems Before Customers Do
Before you launch your optimised checkout, run a full test using a sandbox payment method (like Stripe test mode or PayPal sandbox).
Test scenarios checklist
- Add a digital product to cart → proceed to checkout.
- Complete checkout with guest account (no account creation).
- Verify that shipping fields are hidden (if applicable).
- Complete checkout with billing address only – does the payment gateway accept it?
- Check email delivery: does the customer receive order confirmation and download link/license key?
- Log into My Account: can the customer download the product again?
- Test checkout on mobile device (small screen). Is the layout usable?
- Test checkout in incognito mode (to simulate a new customer).
What about billing fields for digital products?
If you sell digital products to EU customers, you need to collect a billing country for VAT purposes (OSS/IOSS). Use conditional logic to show the country field but hide address lines unless necessary. The “Checkout Fields for Blocks” plugin PRO add‑on can conditionally show address fields only when the selected country requires them.
⚠️ Important: The
woocommerce_checkout_fieldshook works only with the classic shortcode checkout. For the new block checkout, use the block editor’s native field visibility settings or the plugins mentioned above. Relying on outdated hooks will lead to broken functionality and frustrated customers.
What’s Next?
You now have a checkout page that is stripped down, fast, and trustworthy – perfectly tailored for digital products. But there’s still more you can do to recover customers who almost left.
👉 Next article in this series: Abandoned Cart Recovery – Bringing Back Customers Who Almost Left
We’ll cover automated abandoned cart emails, exit‑intent popups, and how to use the WooCommerce analytics dashboard to track checkout performance.
What’s your biggest checkout frustration? Do you still see shipping fields on your digital product store? Let me know in the comments – I’ll help you troubleshoot.
📌 Key Takeaways (for skimmers)
- The block checkout (React‑powered) is now the default for new WooCommerce stores. The classic shortcode checkout is in maintenance‑only mode.
- Visual customisation is possible without code: use the Gutenberg editor and List View to reorder, hide, or style inner blocks.
- For digital products, remove the Shipping Address block entirely. Use plugins or filters to clean up billing fields, but keep the country for tax/VAT purposes.
- Guest checkout should be enabled – forcing account creation drives away nearly a quarter of customers.
- Trust badges (payment icons, SSL seals, money‑back guarantees) added as image or HTML blocks reduce purchase anxiety.
- Speed optimisation is critical: remove unnecessary blocks, use a CDN, and update to PHP 8.1+.
- Always test your checkout with sandbox payment methods before going live.
- Old PHP hooks may not work on the block checkout. Use native block settings or dedicated plugins instead.
🔗 Internal Links
- Article #1 – WooCommerce in 2026 – Market Share & Trends
- Article #2 – Installing WooCommerce & Setup Wizard
- Article #3 – Adding Your First Product
- Article #4 – License Keys for WooCommerce
- You are here – Optimising Checkout for Digital Products
- Article #6 – Abandoned Cart Recovery (coming soon)