
The way WooCommerce stores orders has changed. Here’s what you need to know to manage orders and customers efficiently.
If you’ve been following this series, you’ve built your store, added products, set up license keys, optimised checkout, and even started recovering abandoned carts. Now it’s time to master the back end.
In this guide, I’ll cover:
- HPOS (High‑Performance Order Storage) – what it is and why it matters
- How to enable HPOS on your store
- Managing orders – viewing, editing, processing refunds
- Understanding WooCommerce order statuses
- Managing customers – profiles, order history, communication
- Advanced order management tools
- Troubleshooting HPOS‑related issues
By the end, you’ll be equipped to run your WooCommerce store like a seasoned professional, even as it grows to thousands of orders.
Let’s get started.
Part 1: What Is HPOS and Why Should You Care?
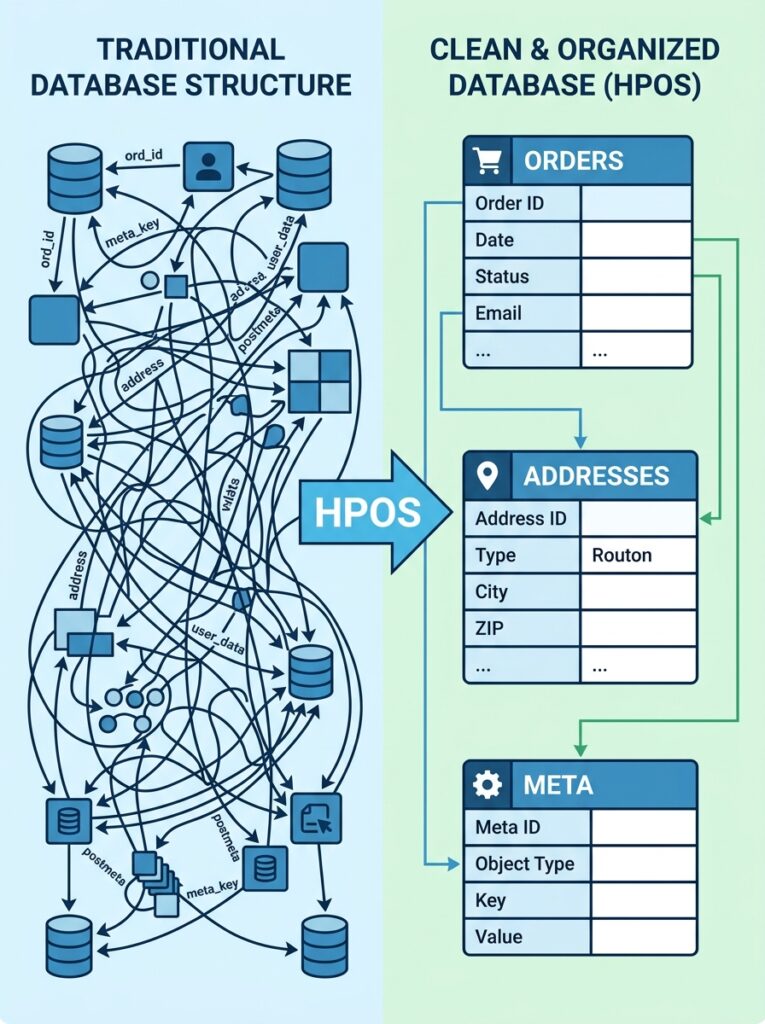
Traditionally, WooCommerce stored orders and related information (like refunds) as custom post types (wp_posts) and post‑meta records (wp_postmeta). For small stores, this worked. But as order volumes grew, the system became sluggish. Querying thousands of orders meant sifting through the same massive database tables that also stored all your pages, posts, and other content.
High‑Performance Order Storage (HPOS) changes this entirely. Introduced in WooCommerce 8.2 (October 2023), it moves order data into dedicated, optimised tables specifically designed for e‑commerce needs.
The new tables include:
wc_orders– main order datawc_order_addresses– billing and shipping addresseswc_order_operational_data– order status, dates, and other operational detailswc_orders_meta– additional order metadata
The benefits of HPOS
For new WooCommerce installations (since version 8.2), HPOS is enabled by default. If you have an older store, you can migrate – but you should do it carefully.
💡 If you’re starting a new store today, HPOS is already on. You don’t need to do anything except benefit from its performance.
Part 2: How to Enable HPOS (For Existing Stores)
If your store predates WooCommerce 8.2 or HPOS was turned off, enabling it is straightforward – but a cautious approach is essential.
Step 1: Check your current storage mode
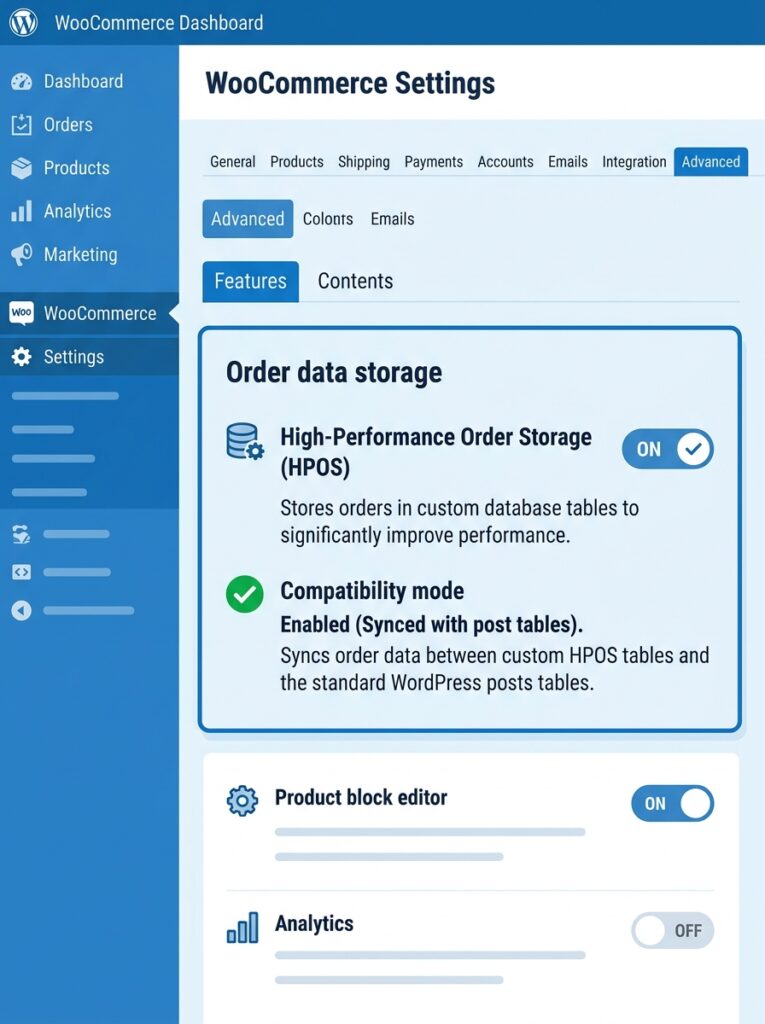
- Go to WooCommerce → Settings → Advanced → Features.
- Look for the Order data storage section.
- You’ll see one of three options:
- WordPress posts tables (legacy mode) – orders still stored in
wp_posts - WooCommerce orders tables (HPOS enabled) – modern, fast storage
- Compatibility mode – both tables are kept in sync (for backwards compatibility)
- WordPress posts tables (legacy mode) – orders still stored in
Step 2: Prepare for migration (for large stores)
If you have many existing orders, follow this process:
- Back up your database – before any migration, create a complete backup.
- Test on a staging site – never enable HPOS directly on your production store first. Copy your production database to a staging environment and test there.
- Enable compatibility mode – toggle the “Enable compatibility mode” checkbox. This starts syncing order data between legacy and HPOS tables.
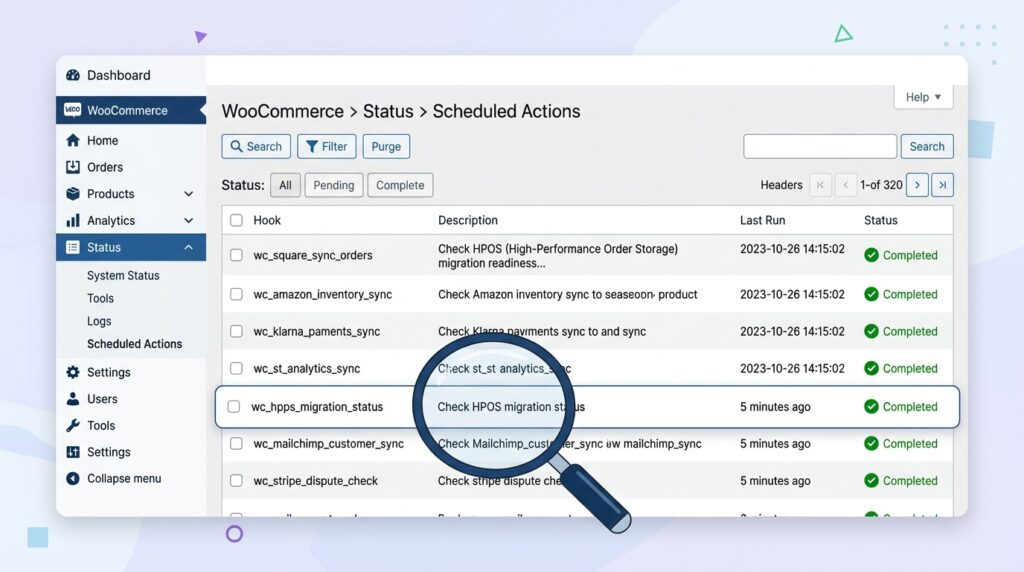
- Monitor the sync – you can check progress at WooCommerce → Status → Scheduled Actions. Wait until all pending synchronisation actions are complete.
- Switch to HPOS authoritative mode – once sync is complete, select “Use the WooCommerce orders tables” as the authoritative storage.
For stores with millions of orders, migration can take a significant amount of time. On a test store with 9 million orders, the migration process took about a week. Use the WP‑CLI command wp wc hpos sync to speed up the process.
⚠️ Before switching, verify that all your plugins and custom code are HPOS‑compatible. Most modern plugins are, but older ones might require updates.
Step 3: Test thoroughly after migration
Once HPOS is enabled and authoritative, test:
- Checkout with every payment method
- Refund processing
- Order editing and management
- Any custom flows specific to your store
If any issues arise, you can revert to legacy storage by toggling the setting back.
Part 3: Managing Orders – The Complete Walkthrough
With HPOS handling the backend performance, let’s focus on the day‑to‑day task of managing orders.
Viewing orders
- Go to WooCommerce → Orders.
- You’ll see a list of all orders with key information:
| Column | What it shows |
|---|---|
| Order number | Unique identifier for the transaction |
| Customer | Name of the buyer (linked to their profile) |
| Date | When the order was placed |
| Status | Current order status (pending, processing, completed, etc.) |
| Total | Order value |
| Actions | Quick links to view, edit, or refund |
Filtering and searching orders
You can filter orders by:
- Date range – today, yesterday, this week, this month, custom range
- Status – any of the eight default statuses
- Customer – specific customer name or email
To search for a specific order, use the search box at the top right of the Orders page. You can search by order number, customer name, or email address.
Viewing a single order
Click on an order number or the “Edit” action link. The order details page provides a complete breakdown:
- Billing & Shipping Info – customer contact details and address. For digital products, shipping fields will be minimal or absent.
- Products Ordered – list of items purchased, including quantity, SKU (if set), and price.
- Order Totals – subtotal, shipping total, taxes, discounts, and final total.
- Order Notes – internal notes for staff or customer‑facing notes (sent via email).
- Order Actions – resend invoice, regenerate download permissions, email customer, and more.
In the block‑based checkout era, the order details page has become more interactive. You can edit product quantities, adjust prices, or even add new products to an existing order – useful when a customer contacts you to modify their purchase.
Editing an order
If a customer asks to change something after checkout (e.g., upgrade their license from Single Site to 5 Sites), you can edit the order manually:
- Open the order.
- Click “Update” (in the top‑right section).
- In the order details panel, you can:
- Add or remove products – click “Add item(s)”, search for the product, and set quantity and price.
- Adjust quantities – change the number of items in the order.
- Change line item prices – apply a manual discount or adjust an incorrect price.
- After making changes, click “Recalculate totals” to update the order value.
- Click “Update” again to save.
The order total will recalculate automatically, and the customer will be notified if you check the appropriate “Notify customer” box.
Part 4: Order Statuses – Understanding the Order Lifecycle
Every order in WooCommerce moves through a series of statuses. Understanding them is essential for smooth operation.
Default WooCommerce order statuses
| Status | Meaning | What you should do |
|---|---|---|
| Pending payment | Order created, but payment not yet completed | Wait for payment confirmation |
| Processing | Payment confirmed, order is being prepared | If physical products: pack and ship. If digital (like plugins): no action needed – license keys will be delivered automatically |
| On hold | Awaiting payment or confirmation | Check payment status; contact customer if needed |
| Completed | Order fulfilled – shipped (physical) or delivered (digital) | Order is finished |
| Cancelled | Cancelled by customer or store owner | No further action |
| Refunded | Payment returned to customer | Ensure refund is processed in your payment gateway |
| Failed | Payment attempt declined or reversed | Contact customer to try another payment method |
| Draft | Manual order created but not yet processed | Fill in details and complete |
How order status flows for digital products
For your use case (selling WordPress plugins and other digital downloads), the typical flow is simpler:
- Customer places order → Pending payment
- Payment succeeds → Processing (or directly to Completed if “Virtual + Downloadable”)
- License keys generated and sent automatically
- Order Completed – customer can download files and activate licenses
Because digital products have no shipping, the “Processing” status is often bypassed. WooCommerce automatically moves such orders to “Completed” immediately after payment.
Changing order status manually
To change an order status:
- Open the order.
- Locate the Order status dropdown in the order details section.
- Select the new status.
- Optionally, add a note (and check “Notify customer” if you want them to receive an email about the change).
- Click “Update” .
Common scenarios where you might change a status manually:
- A customer claims they paid but you don’t see confirmation – change to Processing only after manual verification.
- An order was marked Processing but the customer later requested cancellation – change to Cancelled.
- You issued a partial refund – change status to Partially refunded (requires a plugin or custom code, not built‑in).
Part 5: Managing Customers – Profiles, History and Communication
Customers are the lifeblood of your store. WooCommerce provides a dedicated interface for managing them, independent of the standard WordPress Users list.
Viewing customers
- Go to WooCommerce → Customers.
- You’ll see a table with all registered customers and their key metrics:
| Column | What it shows |
|---|---|
| Name | Customer’s name (linked to their profile) |
| Primary contact email | |
| Orders | Number of orders placed |
| Total spent | Lifetime value of that customer |
| Last order date | When they last purchased |
| Location | Billing country |
| Actions | View profile, edit, or delete |
This view is extremely useful for identifying your best customers, segmenting marketing campaigns (e.g., email high‑spenders about a new plugin release), and spotting customers who haven’t ordered in a while.
💡 For digital product sellers, the “Total spent” column is particularly valuable for understanding which customers are most engaged with your software ecosystem.
Editing a customer profile
Click on a customer’s name or the “Edit” action link. You can:
- View their full profile – including all personal and billing/shipping address fields
- Edit contact information – update email, phone, address details
- View order history – a complete list of every order placed
- Reset password – if the customer has forgotten their login credentials
- Add internal notes – for staff use only
When a customer contacts you with a support issue, the order history is often the first place to check. You can see exactly which products they’ve purchased, which license keys they have, and whether their subscription (if applicable) is active.
Manually creating a customer account
Sometimes a customer purchases via guest checkout and later wants an account. Or you may need to create an account for testing purposes.
Option 1 – From the WooCommerce Customers page:
- Go to WooCommerce → Customers.
- Click the “Add Customer” button.
- Fill in the required fields: name, email, and optional details.
- The customer will receive a password reset email and can set their own password.
Option 2 – From the WordPress Users page:
- Go to Users → Add New.
- Fill in the username, email address, and other details.
- Set the role to Customer (not Administrator or Subscriber).
- Click “Add New User” .
The new account will appear in WooCommerce → Customers automatically.
Communicating with customers
WooCommerce sends automated emails at various stages of the order process:
- Order confirmation – sent when payment is complete
- Processing – sent when an order moves to the processing status
- Completed – sent when the order is complete and download links/license keys are available
- Refund – sent when a refund is processed
- Customer notes – sent when you add a note with “Notify customer” checked
You can customise these email templates at WooCommerce → Settings → Emails. Each email type has its own settings for recipient, subject line, and content.
To send a manual email to a customer:
- Open the relevant order.
- Scroll to the Order notes section.
- Add your message.
- Check “Notify customer” .
- Click “Add” .
The customer will receive an email containing your message. This is perfect for shipping updates, custom requests, or friendly follow‑ups after a plugin purchase.
Part 6: Advanced Order Management Tools
The default WooCommerce order management is solid, but for growing stores, consider these enhancements.
Order tags
Want to label orders with custom tags like “VIP Customer”, “Needs Review”, or “Frequent Refunder”? Order Tags Manager (a free extension) lets you add and manage tags for each order. You can then filter orders by tag.
HPOS compatibility for external systems
If you use external systems like accounting software (Xero, QuickBooks) or shipping tracking systems that directly access your database, verify that they read from the HPOS tables rather than the legacy wp_posts tables. The WooCommerce developer documentation provides guidance on making extensions HPOS‑compatible if you run into issues.
Bulk order updates
To change the status of multiple orders at once:
- Go to WooCommerce → Orders.
- Select the checkboxes next to the orders you want to modify.
- Choose the new status from the “Bulk actions” dropdown.
- Click “Apply” .
This is useful for marking a batch of older orders as Completed after a data migration or cleanup.
Part 7: Troubleshooting HPOS‑Related Issues
HPOS is stable and reliable, but issues can arise – especially if your store uses older plugins or custom code.
| Issue | Likely cause | Solution |
|---|---|---|
| Orders not appearing after migration | Sync incomplete or failed | Check WooCommerce → Status → Scheduled Actions. Run pending sync actions manually. |
| Custom plugin breaks after HPOS enable | Plugin not HPOS‑compatible | Update the plugin to its latest version. Contact the developer for an HPOS update. |
| External system can’t read orders | System queries wp_posts directly | Update the integration to read from HPOS tables (wc_orders, wc_order_addresses, wc_orders_meta) |
| Order filtering much slower than expected | HPOS not actually enabled (still using legacy tables) | Go to WooCommerce → Settings → Advanced → Features and verify HPOS is selected. |
| Compatibility mode causing duplicate data | Both tables being written to | If all plugins are HPOS‑compatible, disable compatibility mode. |
If you need to revert: You can switch back to legacy posts table storage at any time via the Features settings. However, once you’re confident everything works, staying on HPOS is strongly recommended for performance.
What’s Next?
You now have complete control over orders and customers, backed by HPOS for blazing‑fast performance. The store is fully operational.
👉 Next article in this series: Marketing & Promotions – Coupons, Discounts, and Email Campaigns for WooCommerce
We’ll cover creating discount coupons, running flash sales, setting up up‑sell and cross‑sell campaigns, and integrating your store with email marketing services.
Have you migrated to HPOS yet? Any questions about managing orders or customers? Let me know in the comments.
📌 Key Takeaways (for skimmers)
- HPOS (High‑Performance Order Storage) is the new standard for WooCommerce order management – dedicated tables for up to 5x faster order processing.
- New stores have HPOS enabled by default (WooCommerce 8.2+). Existing stores should migrate after testing on a staging site.
- Orders are managed at WooCommerce → Orders – view, filter, edit, and update statuses.
- Order statuses include Pending payment, Processing, Completed, Cancelled, Refunded, Failed, On hold, and Draft.
- For digital products, orders typically move from Pending → Completed automatically (no shipping).
- Customers are managed at WooCommerce → Customers – view order history, edit profiles, manually add accounts.
- HPOS compatibility is essential. Check that all plugins support HPOS before switching authoritative mode.
- Troubleshooting issues with orders or customers often starts with verifying HPOS status and checking scheduled actions.
🔗 Internal Links
- Article #1 – WooCommerce in 2026 – Market Share & Trends
- Article #2 – Installing WooCommerce & Setup Wizard
- Article #3 – Adding Your First Product
- Article #4 – License Keys for WooCommerce
- Article #5 – Optimising Checkout for Digital Products
- Article #6 – Abandoned Cart Recovery
- You are here – Managing Orders & Customers with HPOS
- Article #8 – Marketing & Promotions (coming soon)