
WooCommerce alone won’t do this. Here’s the complete guide to adding license keys, managing activations, and protecting your digital products.
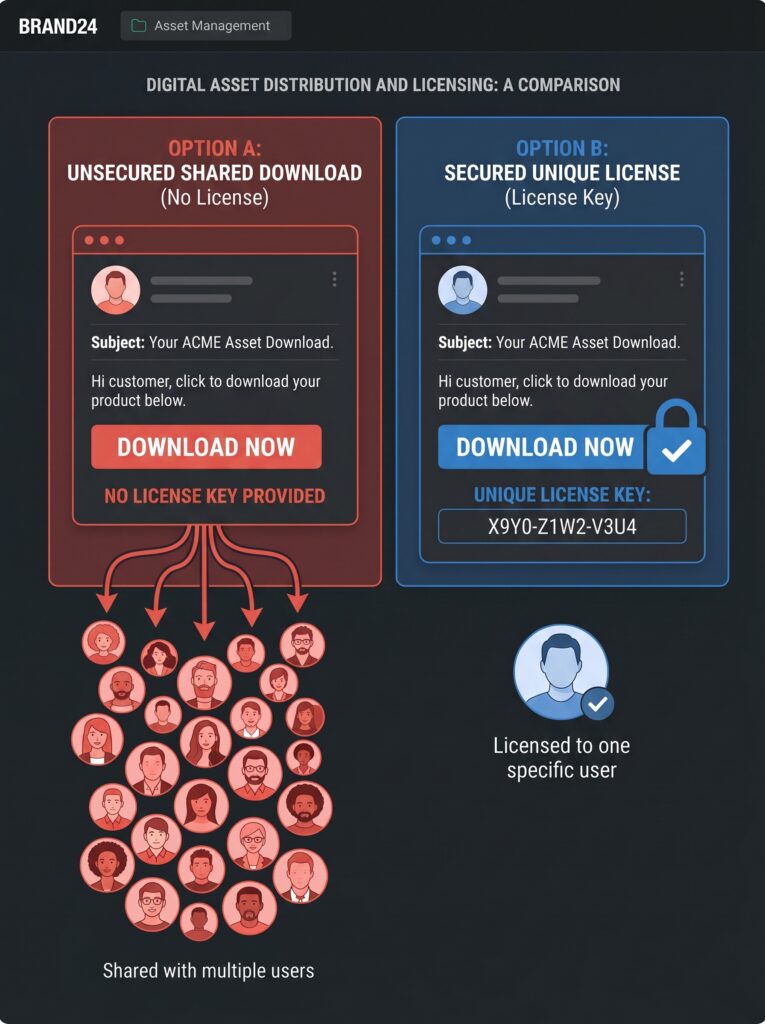
In the previous article, you added your first digital product — a simple plugin download. But here’s the problem: WooCommerce, by itself, does not manage software licenses. Out of the box, it does not track activations. It does not validate license usage. If you sell a plugin and just email a download link, nothing stops one customer from giving that file to a hundred friends.
This is where license keys come in.
In this guide, I’ll cover:
- Why WooCommerce needs a license manager
- The best free and paid license key plugins for 2026
- Step‑by‑step installation of Digital License Manager (free)
- Generating and assigning license keys to products
- Setting activation limits and expiration dates
- How customers receive, view, and activate their licenses
- REST API for integrating license validation into your plugins
- Real‑world example: selling a WordPress plugin with license keys
Let’s turn your digital store into a professional software licensing system.
Part 1: Why You Need a License Manager for WooCommerce
When you sell software, digital products, or any access‑controlled content, you need more than just file delivery. You need:
- Unique license keys – Each customer gets a one‑time key that proves they paid.
- Activation limits – A license may work on 1 site, 5 sites, or unlimited sites.
- Expiration control – For subscriptions or fixed‑term licenses (1 year, etc.).
- Customer self‑service – Buyers should see their licenses in their “My Account” dashboard.
- Remote deactivation – You or the customer should be able to revoke access.
- API integration – Your plugin must be able to check if a license is valid.
WooCommerce’s built‑in “downloadable product” feature creates a single ZIP file download link. It does not generate unique keys per purchase. It does not limit how many times a file can be downloaded by different people. And it certainly doesn’t integrate with your software running on external sites.
A dedicated license manager plugin fills all these gaps. It integrates directly with WooCommerce, automatically generates a key when an order is completed, emails the key to the customer, and provides an API for your software to validate the key.
Part 2: Choosing the Right License Key Plugin (Free vs Paid)
Several license manager plugins are available for WooCommerce in 2026. Here’s a comparison of the most popular and well‑maintained options.
Free Plugins (WordPress.org)
“Serial Numbers & License Keys for WooCommerce” recently removed all Pro feature restrictions — the free version now includes everything. This is an excellent choice for a fully functional free solution.
Paid Plugins (Premium / CodeCanyon)
| Plugin | Price | Key Features |
|---|---|---|
| WooCommerce Software Add‑On (from Woo.com) | $79/year | End‑to‑end license management, upgrade pricing, REST API |
| API Manager for WooCommerce (Kestrel) | $179/year | Modern API management, token support, advanced features |
| License Manager for WooCommerce Pro | Variable (from developer) | Encrypted storage, REST API, bulk tools, software license certificates |
For most beginners and small‑scale sellers, a free plugin like Digital License Manager will be more than sufficient. It supports simple and variable products, automatic key generation on purchase, delivery via email and the My Account area, activation limits, and a REST API for license validation.
In this guide, I’ll use Digital License Manager as our example — it’s free, actively maintained, and feature‑rich. If you already use another plugin from the list above, the setup steps will be very similar.
Part 3: Installing Digital License Manager
Installation is standard for any WordPress plugin.
Step 1 – Install the plugin
- Go to Plugins → Add New in your WordPress admin.
- Search for “Digital License Manager”.
- Click “Install Now”, then “Activate”.
Step 2 – Initial configuration
After activation, navigate to License Manager → Settings (a new menu appears).
Key settings to review:
| Setting | Recommended value | Why |
|---|---|---|
| Order status for license delivery | Completed | Delivers key only after payment is confirmed |
| Show licenses in My Account | Enabled | Customers see their keys and activation status |
| Allow manual activation from My Account | Enabled (optional) | Lets customers add domains manually |
| License key generator type | Random (unique) | Ensures no duplicate keys |
💡 If you’re selling subscription‑based software, you can also set up automatic expiration and renewal reminders under the “Expiration” tab.
Part 4: Generating License Keys (Bulk Creation)
Before you can assign keys to products, you need to create the keys themselves. Digital License Manager offers two approaches.
Option A – Auto‑generated keys (recommended)
The plugin can automatically create a unique key every time an order is placed. This is the simplest method — you don’t need to pre‑generate anything.
To enable this, when editing a product, check “Generate license keys automatically for this product” (I’ll cover this in Part 5).
Option B – Pre‑generate keys in bulk
If you need predefined keys (e.g., for compatibility with an existing system), you can bulk‑generate them:
- Go to License Manager → Generators.
- Click “Add New” and define a key pattern (e.g.,
MYPLUGIN-#####-#####). - Set the number of keys to generate (e.g., 500).
- Click “Generate”.
The plugin creates the keys, stores them in a dedicated database table, and marks them as “available”. When a product using that generator is purchased, the system automatically pulls an unused key from the stock.
If you have an existing list of keys (e.g., from another licensing system), you can also import them via License Manager → Licenses → Import. The plugin supports CSV and TXT uploads.
💡 Stock synchronisation is automatically handled: available keys represent inventory; when a key is assigned, stock decreases. The product will go out of stock when no keys remain.
What a generated key looks like
Default keys are long random strings — perfectly secure. You can customise the generator to create keys with prefixes, separators, and specific patterns using placeholders. For example, a generator pattern like EB-#####-##### produces keys such as EB-HYQ8E-6P4QE or EB-8F9D2-3K7L1. Customising your key format makes the key look professional and clearly shows which product it belongs to.
Part 5: Assigning License Keys to a Simple Product
Now for the core step: connecting your product to the license manager.
- Go to Products → All Products, then edit your plugin product (or create a new one).
- In the Product Data panel, ensure the “Downloadable” checkbox is checked.
- Find the new “License” tab (added by Digital License Manager).
- Configure the license settings:
| Setting | What to choose |
|---|---|
| License activation | Turn on |
| Stock type | “Unlimited” (for auto‑generation) or “From generator” (if pre‑generated) |
| Generator | Select the generator you created (or “Auto‑generate”) |
| Maximum activations per license | How many sites can use one key (e.g., 1, 5, or leave blank for unlimited) |
| License validity | Days after purchase (blank = never expires) |
- Publish or Update the product.
When a customer completes a purchase of this product, Digital License Manager automatically:
- Generates or assigns a unique license key
- Records the key in the database, linked to the customer and order
- Sends an email with the key to the customer
- Displays the key in the customer’s WooCommerce → My Account → Licenses section
- Tracks activations: each license can be used on up to X domains (as you set in “Maximum activations per license”)

Part 6: Variable Products – Different Keys for Different Tiers
If you sell a plugin with multiple tiers (e.g., “Single Site” license vs “5 Sites” license), use Variable Products.
The setup is similar, but you configure licensing per variation.
- Create a Variable Product as described in the previous article.
- Add an attribute called “License Tier” with values: “Single Site”, “5 Sites”.
- Create variations — one for each tier.
- For each variation, go to the “License” tab (inside the variation settings).
| Variation | Recommended settings |
|---|---|
| Single Site | Max activations = 1 |
| 5 Sites | Max activations = 5 |
You can also assign different generators per variation. This way, you can generate keys that are pre‑formatted to indicate the tier (e.g., starting with “SS-” for Single Site and “5S-” for 5 Sites).
The plugin supports these per‑variation settings seamlessly. Customers will receive the appropriate license key based on which variation they purchased.
Part 7: The Customer Experience – What Buyers See
Let’s walk through what your customers experience after purchasing a licensed product.
After purchase completion
- Order confirmation email – Includes the license key automatically.
- My Account → Downloads – The product download link is shown.
- My Account → Licenses – A new section appears listing all purchased licenses. It shows: license key, product name, activation status, remaining activations, expiration date, list of activated domains/sites, and action buttons (deactivate).
Activating a license
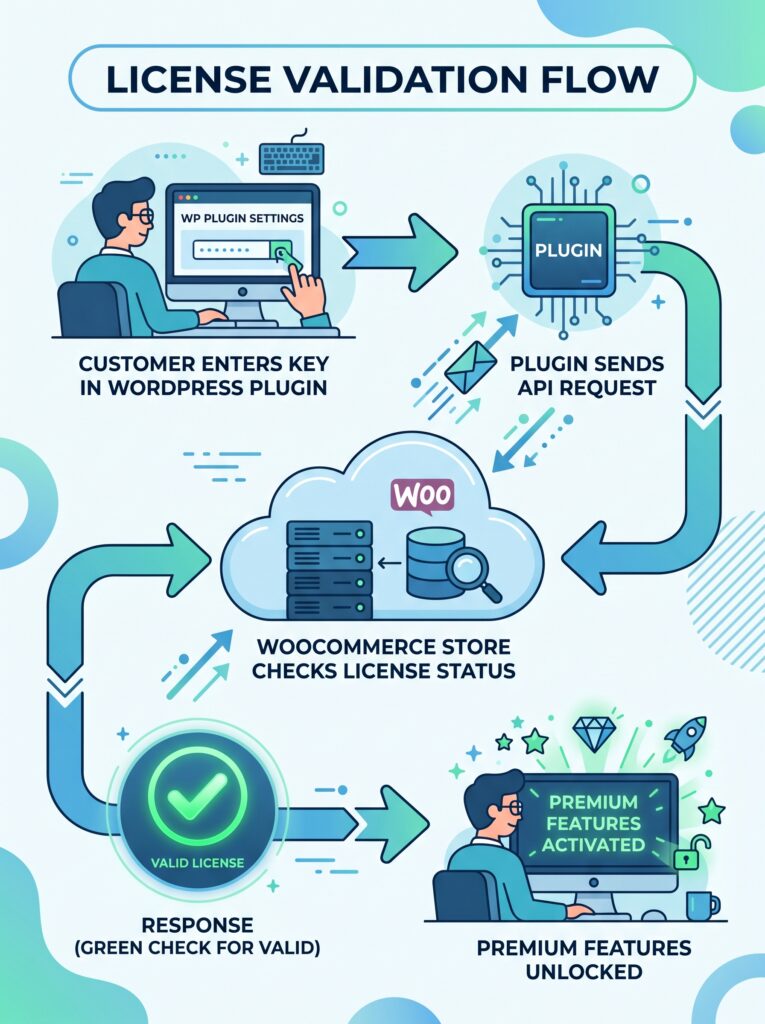
Your customer installs your plugin on their WordPress site. The plugin’s settings include a field where they enter the license key.
Your plugin then makes an API call back to your WooCommerce store to validate the key. If the license is valid and within activation limits, the API responds with “success”, and your plugin unlocks premium features.
This validation process happens securely via REST API — not by storing your admin credentials inside the plugin.
Deactivation
Customers can deactivate a site from their My Account area. After deactivation, that activation slot becomes available again, allowing the customer to move the license to a different site.
If you ever need to intervene (e.g., a customer forgot their password), you can manually deactivate activations from the admin dashboard. You can see the IP address, user agent, and label of each activation — helpful for support.
Part 8: REST API – Validating Licenses from Your Plugin
Your plugin needs to check if a license key is valid. Digital License Manager provides a REST API for exactly this purpose.
API base endpoint (default)
Once your store is running on a live domain, the base URL for API requests will be:
text
https://yourstore.com/wp-json/dlm/v1/
Authentication
All API requests require authentication using an API key. You create this key inside WordPress admin: License Manager → Settings → API. Generate an API key, then share it securely in your plugin’s configuration.
Key API methods
| Method | Endpoint | Purpose |
|---|---|---|
| POST | /licenses/activate | Activate a license key for a specific domain |
| POST | /licenses/validate | Check if a license is active and still valid |
| POST | /licenses/deactivate | Release an activation slot |
| GET | /licenses/{id} | Retrieve full details of a license |
| GET | /stats | Dashboard statistics (admin only) |
All endpoints return JSON responses, making integration straightforward from any programming language or from within WordPress itself. The API is protected by your chosen API key and endpoint permissions.
Example validation call (from your plugin’s code)
In your WordPress plugin, you might make a request like this:
php
$response = wp_remote_post( 'https://yourstore.com/wp-json/dlm/v1/licenses/validate', [
    'headers' => [
        'X-API-Key' => 'your_api_key_here',
        'Content-Type' => 'application/json',
    ],
    'body' => json_encode([
        'license_key' => $customer_entered_key,
        'domain' => home_url(),
    ]),
] );
If the license is valid and within activation limits, the API returns something like:
json
{
  "success": true,
  "data": {
    "status": "active",
    "expires": "2027-04-21",
    "activations_remaining": 4
  }
}
Your plugin then unlocks premium features and optionally stores the validation result in a local option or transient to avoid checking on every page load.
For detailed REST API reference, check the plugin’s official documentation.
Part 9: Real‑World Example – Selling a WordPress Plugin
Let’s walk through a complete scenario.
Product: “SEO Toolkit” premium plugin.
Pricing: $49/year subscription (handled by WooCommerce Subscriptions).
Licensing: Each license works on up to 3 websites. Keys expire after 365 days.
Setup in WooCommerce
- Install WooCommerce Subscriptions and Digital License Manager.
- Create a Variable Product with two attributes:
- “Subscription” = “Yearly”
- “Sites” = “1 site” / “3 sites”
- Create variations:
- “Yearly – 1 site” → max activations = 1
- “Yearly – 3 sites” → max activations = 3
- Enable license generation for each variation.
- Configure the plugin to expire licenses after 365 days, synchronised with the subscription expiration (using the Subscriptions integration add‑on if available).
After purchase
The customer receives their license key by email. They install the “SEO Toolkit” free version from WordPress.org, then enter the license key in the plugin settings. Your plugin validates the key via your store’s REST API and activates premium features for that specific domain, up to the maximum allowed sites.
Renewal
When the subscription renews after one year, WooCommerce Subscriptions processes the payment. The license manager detects the renewal and extends the license expiration by another 365 days automatically. The customer never needs to enter a new key.
If the customer does not renew, the license expires, and the plugin’s validation checks start failing — premium features become locked automatically.
Part 10: Troubleshooting Common License Manager Issues
What’s Next?
Now you have a fully functioning license key system for your digital products — your store can now sell WordPress plugins like a pro.
In the next article, we’ll cover the customer checkout experience: how to remove unnecessary fields for digital products, offer one‑page checkout, and reduce cart abandonment.
👉 Next article in this series: Optimising Checkout for Digital Products – Removing Shipping Fields, One‑Page Checkout & Conversion Tips
Are you planning to sell WordPress plugins? Which license model appeals to you most — lifetime keys, yearly subscriptions, or tiered pricing? Let me know in the comments.
📌 Key Takeaways (for skimmers)
- WooCommerce alone does not manage software licenses — you need a dedicated license manager plugin.
- Top free license manager plugins in 2026: Digital License Manager (feature‑rich), Software License Lite, Serial Numbers & License Keys, Licenzo, Key Manager.
- Digital License Manager supports simple and variable products, automatic key generation, email delivery, My Account display, activation limits, and REST API.
- License keys can be auto‑generated on purchase, or pre‑generated in bulk using custom patterns.
- Variable products support per‑variation license settings — ideal for multi‑tier pricing (e.g., single site vs 5 sites).
- Customers see their licenses in My Account → Licenses and can manage their own domain activations.
- REST API allows your plugin to validate keys, check activation status, and remotely deactivate domains.
- Real‑world use case: sell a WordPress plugin with subscription billing, activation limits, and automatic renewal of license expiration.
🔗 Internal Links
- Article #1 – WooCommerce in 2026 – Market Share & Trends
- Article #2 – Installing WooCommerce & Setup Wizard
- Article #3 – Adding Your First Product – Simple, Variable, and Digital Downloads
- You are here – License Keys for WooCommerce
- Article #5 – Optimising Checkout for Digital Products (coming soon)